| Building an Earthbag & Stone Rainwater Storage Cellar by Kelly Hart |
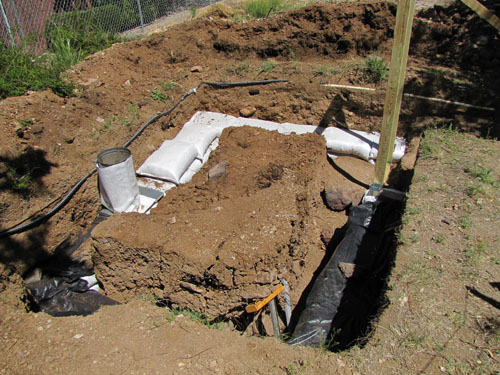
I decided to build a simple recessed cellar in my yard that would serve a variety of functions, including rainwater storage, root cellar and space for vermiculture (worm bins). All of these require relatively cool but not freezing conditions, so digging into the ground was a good way to accomplish this. It seemed like the easiest approach would be to build this primarily with earthbags. First I calculated how large it needed to be in order to hold the two large (275 gallon) water tanks I intended to buy, as well as provide enough space for produce and worms. It was a tricky business to fit all of this in the space available, especially because I had to work between existing underground irrigation pipes. I carefully dug and measured until I had outlined where the hole needed to be.
The above photo shows how I fit the hole adjacent to the water lines. I (and a friend who wanted to learn earthbag building) dug down nearly four feet around the perimeter, creating a trench wide enough for the earthbags. My idea was that the soil from the central island could be used to fill some of the bags. Very quickly we discovered that digging wasn't very easy because we continually encountered stones of many sizes, some quite large. Evidently the soil in that location was actually fill that was pushed into the yard around the time of the original construction of our house (over 70 years ago). So we started making a pile of stones beyond where we could throw the dirt, and this pile got bigger and bigger. I was amazed at how many stones were down in that hole.
Once we had the trench dug we could start laying the bags filled with the soil that came out of the hole. I made sure that the soil was damp enough to compact solidly when tamped. I kept black plastic over the bags where we weren't working to protect them from the sun. We used four-point barbed wire between each course of bags. Because this cellar was intended to store root crops as well as the other functions, I did not line the outside of the earthbag walls with plastic as a moisture barrier. The humidity is actually desirable for most root crops, and it wouldn't hurt the tanks or the worms either.
In the above photo you can see how I created steps dug out of the bank that lead down to a door frame that is propped into place. I used treated wood to retard decay since some of the wood would be in contact with the earth.
To anchor the door frame to the bag walls I fabricated some simple metal brackets with holes for nails that pierce bags both above and below, as well as connect to the frame with screws. I also did this in the middle and at the top of the frame as the walls got higher.
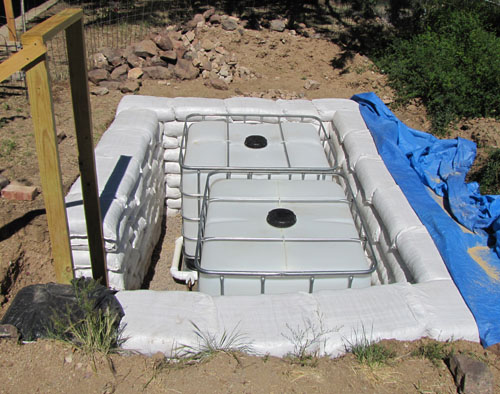
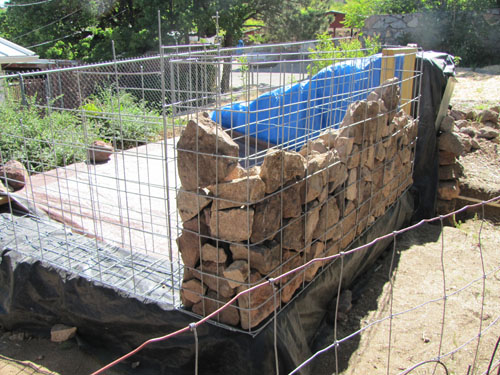
At the point shown in the above photo I had used every scrap of soil left from digging the hole to fill the bags. This got the wall about a foot above the grade level on three sides and inclining all the way to the top on one end. The wood plank on the left is a top plate that will connect to the roof rafters, and it is pinned into the bag wall with long rebar stakes. On top of the water tanks I fitted a piece of OSB to serve as an accessible platform for the worm bins or root crops. The pipes that are visible are 3 inch inlet and overflow pipes for the rainwater. The overflow just dumps into a cobbled area just outside the earthbag wall. I knew that because of the nature of the loose rubble below there that water would readily drain away.
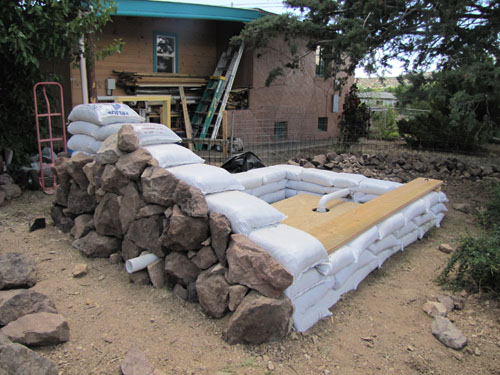
I decided to line the exterior of the exposed earthbags with stones all the way around the building. On this sloping wall I just dry stacked the stones, making sure that they were as stable as possible as they were placed. I filled spaces between them with smaller rocks, trying to keep any sunlight from finding its way into where the bags are.
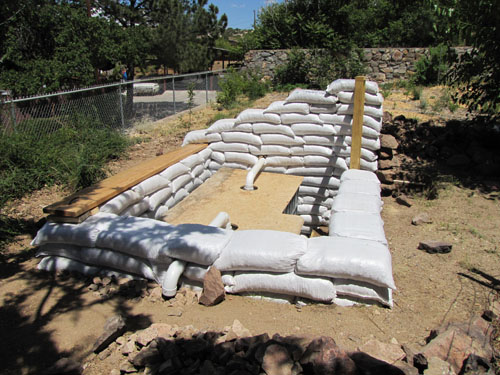
Rather than importing more soil to fill bags for the rest of the walls, I decided to create gabion cages and just fill them with all of the extra stones that were dug up from the hole. I figured that this would also provide plenty of ventilation for the cellar so I wouldn't need to create separate vents. I used very heavy duty welded metal panels for the cages that I bought at a local hardware store. As I placed the stones inside I periodically spanned the space between the two sides of the cages with wire tied to keep them from bowing outward with the pressure from the rocks.
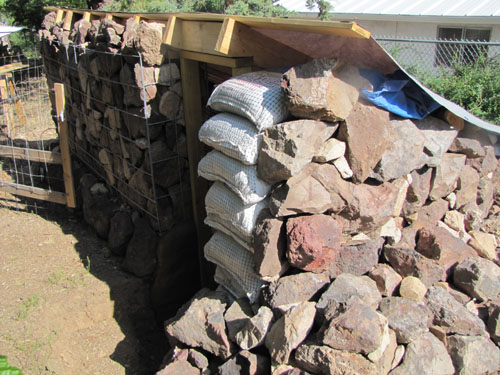
I wired a wooden top plate on top of the gabion wall as an anchor for the rafters, and then secured stringers on the rafters to hold the metal roofing. In the above photo you can see the temporary tarp covering the cellar. The bags that are visible have been lined with synthetic bird netting to serve as mesh for the plaster over that small end of the wall; I didn't want to stack stones up that far. Between the rafters I stapled some scavenged fiberglass insulation, and then lined this with a decorative piece of cloth we had on hand.
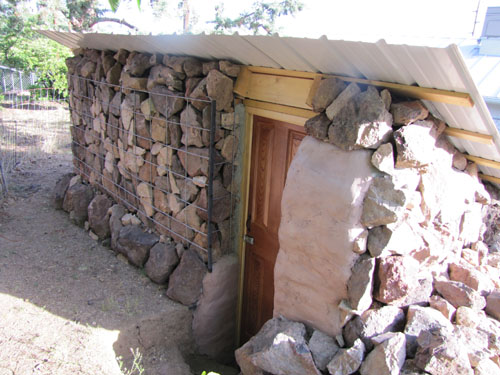
This is what the final cellar looks like with a second hand door that I took apart and insulated on the inside with foam. I am quite pleased with the overall rustic look. Now I am thinking of planting berry vines around it to climb up and over the building and utilize the runoff rain from that roof shed.
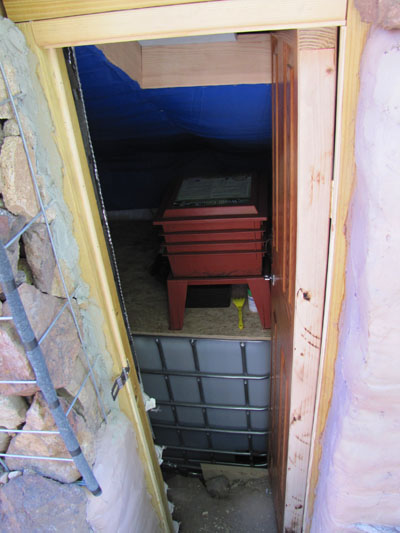
Peeking inside the door you can see the worm bins perched on top of the tanks. It is easy to step inside to work with them. Not seen is the final interior plumbing that directs a hose to outside the rock wall, and the little solar pump that operates with a little 40 watt solar panel mounted on the roof. If I throw a switch on a sunny day I can use that rain water to irrigate my garden.
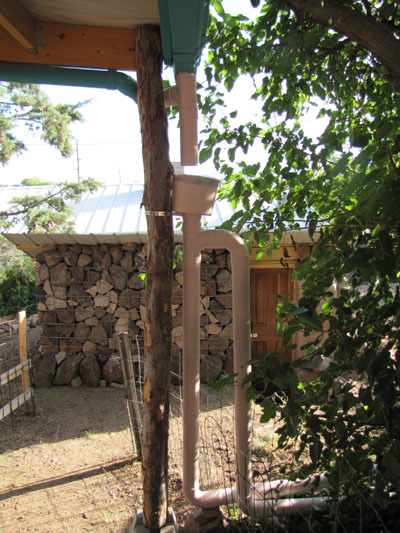
In the foreground you can see the branched system for delivering rainwater to the tanks. The downspout from the gutter on the house feeds into a bucket that is fitted with an eighth inch screen to filter out larger debris. Then the water first goes straight down to fill a "first flush" reservoir. Once this pipe is full the water will be diverted into the side pipe that is plumbed to the water tanks.
When I want to empty the first flush reservoir there is a valve with a long handle that I can open and water will empty into a small sump. Then I would close the valve again so the system is ready to receive more rain that happens to come along. In this way only the cleanest water will enter the tanks. And because the tanks are completely out of the daylight there should be no algae forming inside of them. So far I am quite happy with how all of this is performing. I have collected about 400 gallons of water from two rain events. After the next rain I will need to use some of the water to make room for subsequent storms. The worms seem quite happy as well. The interior temperature has stabilized to be in the mid 70 degrees F. all day and night. This is with daytime temperatures rising near 100 degrees and nighttime temperatures sometimes dropping into the 50's. I had to line the inside rock walls with bubble/foil insulation to keep the warm air from flowing through too readily inside and warming things too much. I'm pretty sure that with all of that thermal mass in the cellar it will never freeze in there. Cozy! |