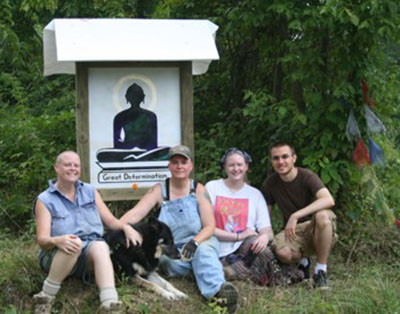
Sustainainable Building at Great Determination Buddhist Hermitage
The small city of Athens, Ohio is a hotbed of sustainable building practices. There are nearly two dozen strawbale houses, an earthship and many off the grid dwellings in the vicinity. We did not realize this until after we had moved here. When we decided to stay we spent a year intensively researching alternatives to mainstream building techniques and settled on a plan that fit our very small budget, was simple and low tech, that two reasonably fit persons could build alone. We chose to build an earthbag house. This will be the primary residence for the hermitage staff.
 Dhammatara (left) is a sculptor with a life long interest in the shaping living space. Even as a toddler, building homes for toy animals occupied a great deal of her imagination. We needed a living space and a practice center and construction is within our ability if we can do it ourselves. There are hundreds of alternative lifestyle and green building books out there. Maybe even thousands. The major influences on our choice of building technique were Racing Alone by Nader Khalili and Earthbag Building by Kaki Hunter and Donald Kiffmeyer. Dhammatara (left) is a sculptor with a life long interest in the shaping living space. Even as a toddler, building homes for toy animals occupied a great deal of her imagination. We needed a living space and a practice center and construction is within our ability if we can do it ourselves. There are hundreds of alternative lifestyle and green building books out there. Maybe even thousands. The major influences on our choice of building technique were Racing Alone by Nader Khalili and Earthbag Building by Kaki Hunter and Donald Kiffmeyer.
Authors of alternative building technique books are often so enthusiastic and upbeat they fail to mention that housing codes and restrictions support the mainstream corporate culture to the point of disallowing alternatives or that materials availability is limited by location. We learned to be cautious and to be flexible.
 Hindsight- After months of design work the dome shape was rejected, in favor of sqaure corners and straight walls to accomodate living spaces inside. In hindsight this was a mistake. Because of our straight walls we had to build buttresses - keyed in, stepped up protrusions from the wall centers that stabilize each wall against lateral motion. That means we filled 25% more bags than no buttresses would have required - extending the time, effort and materials needed for the structure by that much. And the rubble filled trench had to be extended to accomodate them as well. Also corners - which buttresses make many more of - are a pain to account for - you have to shorten or lengthen the bags to fit, slowing down the process. And lastly the dome shape eliminates the roof, which cost as much or more than the rest of the structure combined. So if we had to do it again we would make a dome. Hindsight- After months of design work the dome shape was rejected, in favor of sqaure corners and straight walls to accomodate living spaces inside. In hindsight this was a mistake. Because of our straight walls we had to build buttresses - keyed in, stepped up protrusions from the wall centers that stabilize each wall against lateral motion. That means we filled 25% more bags than no buttresses would have required - extending the time, effort and materials needed for the structure by that much. And the rubble filled trench had to be extended to accomodate them as well. Also corners - which buttresses make many more of - are a pain to account for - you have to shorten or lengthen the bags to fit, slowing down the process. And lastly the dome shape eliminates the roof, which cost as much or more than the rest of the structure combined. So if we had to do it again we would make a dome.
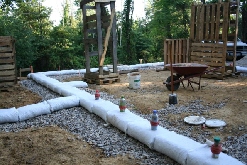
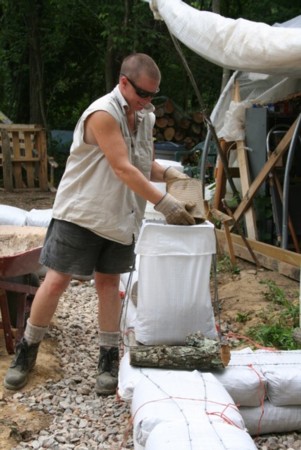
 Materials we used - limestone is common in southeast Ohio, often to get at a layer of coal there is a lot of limestone that has to be removed first, this is available in various sizes. A mix of clay and sand is called for but that is not available here, clay is so common no one wants it. Our particular building site is mostly silt, that won't do for building. We wound up getting several truckloads of "number one crusher run" or "roadbase" that is crushed limestone fines (dust) to 3/4 inch in size. This worked out really well, since when watered and compacted the limestone forms a solid mass. Materials we used - limestone is common in southeast Ohio, often to get at a layer of coal there is a lot of limestone that has to be removed first, this is available in various sizes. A mix of clay and sand is called for but that is not available here, clay is so common no one wants it. Our particular building site is mostly silt, that won't do for building. We wound up getting several truckloads of "number one crusher run" or "roadbase" that is crushed limestone fines (dust) to 3/4 inch in size. This worked out really well, since when watered and compacted the limestone forms a solid mass.
 (I now think we could have used the soil on site, if you dig down there is clay and some sand and we would have been better off building into the earth - easier to reach, better temperature regulation more stability. If the soil had been too loose and soft we could have added a smidgen of cement) (I now think we could have used the soil on site, if you dig down there is clay and some sand and we would have been better off building into the earth - easier to reach, better temperature regulation more stability. If the soil had been too loose and soft we could have added a smidgen of cement)
We purchased woven polyethelene feed sacks in 1000 bag bales from a supplier we found online and followed Khaki Hunter and Donald Kiffermeyer's exceptionally well written and complete directions closely. When each row is compacted and held to the next with barbed wire velcro the wall becomes a monolithic mass.
We used plastic baling twine for tie wires looped over the barbed wire every two feet or so every other layer of bags. These came in handy when we needed to attach something to the wall or climb up a buttress. Worked better than 17 guage wire which breaks after being bent a few times and isn't as strong. We put chicken wire around the window and door openings since we were unfamiliar with the materials we would use to cover the walls with - we later cut it off but used it in the garden to keep away critters.
 We purchased strapping to hold the roof on the wall but when a row of bags was layed over the beam between the rafters the strapping was redundant and we cut it away - we have not found a use for it yet. We purchased strapping to hold the roof on the wall but when a row of bags was layed over the beam between the rafters the strapping was redundant and we cut it away - we have not found a use for it yet.
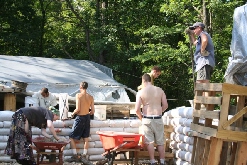
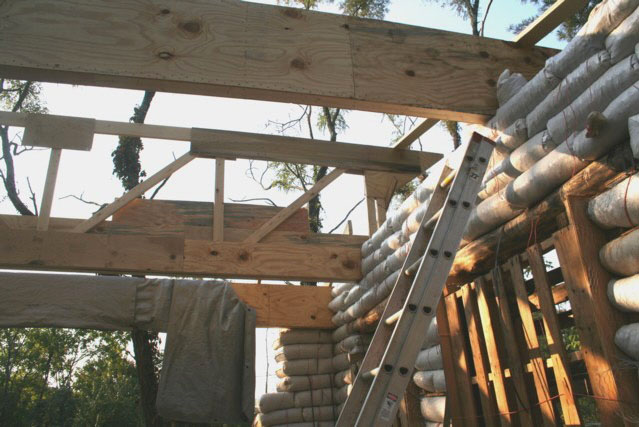
Laminated I beams, trusses other engineered wooden beams were available in theory only they were so expensive and could only be special ordered so we wound up making our own, not a difficult process but a lot of nailing. The specs for building these was found online at the engineered wood association site or APA copyright 1999. The difficulty was getting them into place. We had teams of half a dozen hardy souls, one in particular led by a seasoned professional tree climber. I would not do that again.
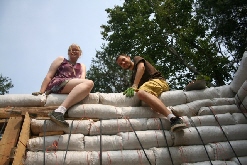
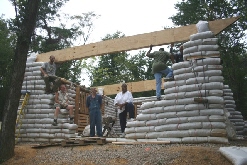 An integral roof is another excellent recommendation for a dome shape, or for building the house into the hillside or ground. I had thought of building a large tripod and using it with block and tackle to lift the beams but instead each was just hoisted on shoulders and muscled into place. It was an uncertain and risky process I don't recommend. The bag walls went up around them and locked them into place. At that point the walls were ten feet or higher and tossing number ten cans of number one crusher run wasn't for us. We had a 22 ft extension ladder that we hooked a pulley to and used that to lift the cans and water efficiently to the bag filler. An integral roof is another excellent recommendation for a dome shape, or for building the house into the hillside or ground. I had thought of building a large tripod and using it with block and tackle to lift the beams but instead each was just hoisted on shoulders and muscled into place. It was an uncertain and risky process I don't recommend. The bag walls went up around them and locked them into place. At that point the walls were ten feet or higher and tossing number ten cans of number one crusher run wasn't for us. We had a 22 ft extension ladder that we hooked a pulley to and used that to lift the cans and water efficiently to the bag filler.
 Five rows of bags up from the ground, doorways, windowsills and buttresses are covered with local soil and straw mixed with cement. A short ways from the house site we started a quarry where the topsoil was peeled away when the powerline right of way was cleared. There is a mix of silt, sand and clay that we screened through 1/2 inch hardware cloth, a wire mesh available in the garden section of building supply stores. A five gallon bucket of this mixed with a number ten can of cement and some straw cut to length - coarse work allows long straw, smoother requires shorter pieces. I have called it dirtcrete. It's fun to work with - gets sticky and plastic like clay, needs the straw fiber for strength, can be troweled or smoothed into shape. The surface is stronger if burnished smooth, objects can be pressed into it and left as additions or removed to leave impression. Five rows of bags up from the ground, doorways, windowsills and buttresses are covered with local soil and straw mixed with cement. A short ways from the house site we started a quarry where the topsoil was peeled away when the powerline right of way was cleared. There is a mix of silt, sand and clay that we screened through 1/2 inch hardware cloth, a wire mesh available in the garden section of building supply stores. A five gallon bucket of this mixed with a number ten can of cement and some straw cut to length - coarse work allows long straw, smoother requires shorter pieces. I have called it dirtcrete. It's fun to work with - gets sticky and plastic like clay, needs the straw fiber for strength, can be troweled or smoothed into shape. The surface is stronger if burnished smooth, objects can be pressed into it and left as additions or removed to leave impression.
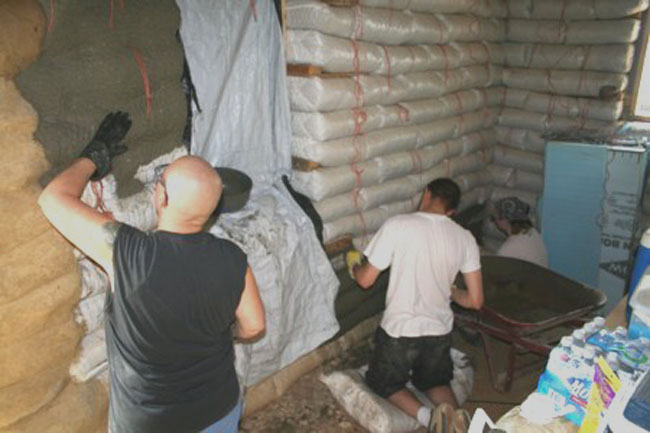
 The rest of the walls we covered with papercrete. A mixture of cellulose insulation, portland cement, borax and water. We filled a four cubic foot wheelbarrow with cellulose (less labor than tearing up newspapers) breaking it up into little chunks. Then we watered this to uniform moistness, added a cup of borax laundry booster to prevent mold and mildew, stirred this in. Then we added one to two number ten cans of Portland cement and mixed this in adjusting the water content so the mix felt light and fluffy. The mixing was done by hand wearing rubber gloves dusted inside with cornstarch. We didn't wear masks but probably should have. The borax causes the mix to give off a mentholized ammonia smell that burns and of course the dust from the cement and even the cellulose should be avoided. Once mixed it's not bad though. If the mix is too dry it's harder to work with, and not as sticky, if it's too wet it's messier and harder to work with also. The rest of the walls we covered with papercrete. A mixture of cellulose insulation, portland cement, borax and water. We filled a four cubic foot wheelbarrow with cellulose (less labor than tearing up newspapers) breaking it up into little chunks. Then we watered this to uniform moistness, added a cup of borax laundry booster to prevent mold and mildew, stirred this in. Then we added one to two number ten cans of Portland cement and mixed this in adjusting the water content so the mix felt light and fluffy. The mixing was done by hand wearing rubber gloves dusted inside with cornstarch. We didn't wear masks but probably should have. The borax causes the mix to give off a mentholized ammonia smell that burns and of course the dust from the cement and even the cellulose should be avoided. Once mixed it's not bad though. If the mix is too dry it's harder to work with, and not as sticky, if it's too wet it's messier and harder to work with also.
 A handful of this is patted between the palms to make a patty, this is then slapped into the crevice between the layers of bags and the next is attached to that. The patty formation is important for the fibers to knit together, followed by the slapping and tapping with open fingers forms a cohesive felted surface that cures and dries leaving a visible texture. This stuff can't be troweled, it doesn't like being squeezed or pressed, it likes being patted. The finished result is a soft cardboard like an eggcarton. This will have to be sealed. It's relative fragility and is disturbing until you think that the underlying wall is so strong, compared to stick built houses where the surface boards, though tougher, can still be broken or burned and the underlying wall structure is much more fragile than the earthbags. A handful of this is patted between the palms to make a patty, this is then slapped into the crevice between the layers of bags and the next is attached to that. The patty formation is important for the fibers to knit together, followed by the slapping and tapping with open fingers forms a cohesive felted surface that cures and dries leaving a visible texture. This stuff can't be troweled, it doesn't like being squeezed or pressed, it likes being patted. The finished result is a soft cardboard like an eggcarton. This will have to be sealed. It's relative fragility and is disturbing until you think that the underlying wall is so strong, compared to stick built houses where the surface boards, though tougher, can still be broken or burned and the underlying wall structure is much more fragile than the earthbags.
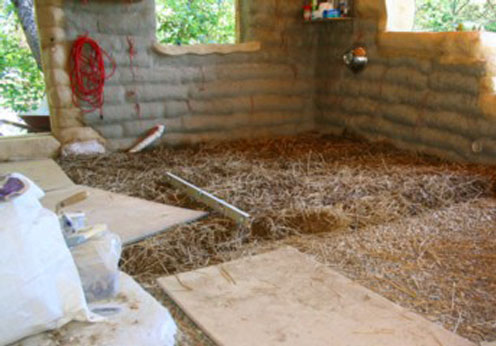 We started on the floor with round, washed, Number 57s or 1/2-1 1/2 inch stones quarried nearby by the Cochrans. We ordered the minimum of ten tons and got eleven. Then we spread a level 4 inch thick layer on the floor by wheelbarrow loads. It is fairly easy to shovel and move compared to the roadbase. It's also delightful because of the shapes and holes and colors and fossils among them. We saved out the best for embedding in the surface later. The straw rich adobe layer is going on now. Five gallons soil from near the house site, mixed with 3/4- 4/5 gallon portland cement and approximately three gallons rainwater make a thin slurry. Into this a five inch thick shingle from a bale of wheat straw is massaged until thoroughly coated then flung onto the floor in a 4 inch thick layer. This is shifted around until level. One bale used this way covered about a ten by six foot area and though we forgot to count took about thirteen buckets of dirt and about forty gallons rainwater. The unsealed final layer. The middle layer of straw rich adobe mortar over washed river stone. . We started on the floor with round, washed, Number 57s or 1/2-1 1/2 inch stones quarried nearby by the Cochrans. We ordered the minimum of ten tons and got eleven. Then we spread a level 4 inch thick layer on the floor by wheelbarrow loads. It is fairly easy to shovel and move compared to the roadbase. It's also delightful because of the shapes and holes and colors and fossils among them. We saved out the best for embedding in the surface later. The straw rich adobe layer is going on now. Five gallons soil from near the house site, mixed with 3/4- 4/5 gallon portland cement and approximately three gallons rainwater make a thin slurry. Into this a five inch thick shingle from a bale of wheat straw is massaged until thoroughly coated then flung onto the floor in a 4 inch thick layer. This is shifted around until level. One bale used this way covered about a ten by six foot area and though we forgot to count took about thirteen buckets of dirt and about forty gallons rainwater. The unsealed final layer. The middle layer of straw rich adobe mortar over washed river stone. .
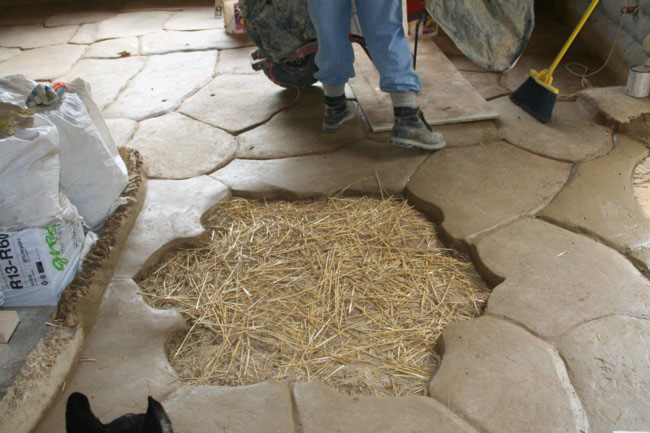 Striving for restraint I finally decided to place one design in the floor and started by outlining the shape. The final layer is troweled smooth and burnished lightly with a potter's rib. Striving for restraint I finally decided to place one design in the floor and started by outlining the shape. The final layer is troweled smooth and burnished lightly with a potter's rib.
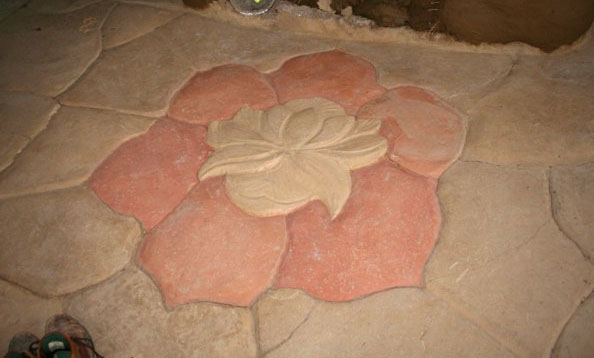
For contrast Quikrete terra cotta colorant was added to the water in the tiles of the design backround. It is just red iron oxide which is available through pottery supply places but was not used only because I was curious.
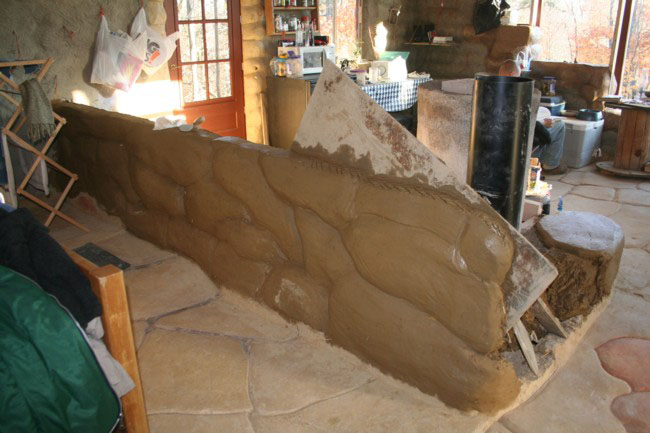 Back wall of bench sculpted of cob Back wall of bench sculpted of cob
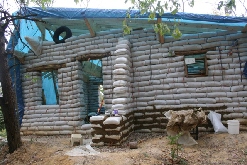
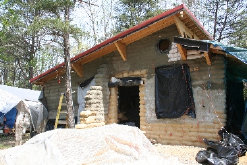
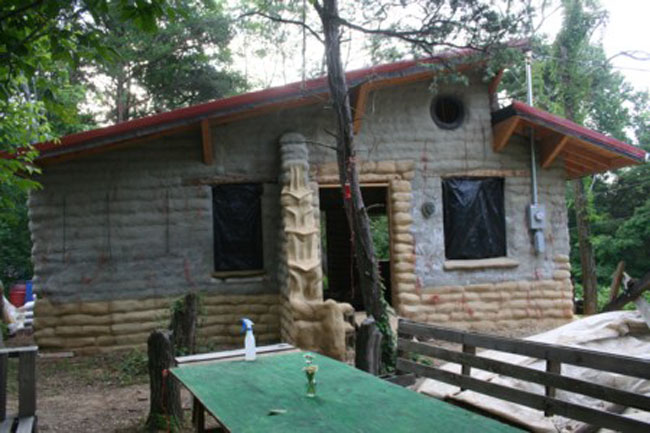 View of residence from West. View of residence from West.
|
