Difficulty: Moderately challenging
This article explains the basics about building an insulated earthbag home. Most earth structures are in hot, dry climates. The techniques presented here enable you to build an earthbag home in a cold climate. By simply filling, stacking and tamping bags you can construct beautiful homes, offices, shops and other structures. Earthbag buildings are sustainable, nontoxic, quiet, rot proof, and mold, fire, hurricane and flood resistant. Using lightweight bags of insulation speeds the building process.
Things You'll Need: Shovel, bucket, garden hose (or water), wheelbarrow, tamper, slider, gravel (lower courses), soil, earthbags (sandbags), barbed wire, wire cutters, level
Step 1
Clear, level and prepare the building site. Remove and save topsoil for gardening and landscaping. Stake out the project with string and wood stakes. Bury plumbing and electric according to safe building practices. Stockpile soil, gravel and insulation around the site in such a way as to minimize labor.
Step 2
Build a rubble trench foundation by digging a trench a little wider than the earthbag walls and about 18"-24" deep. If you use Option B (see step 8), then make your trench about 10" wider. Add gravel, rocks or broken concrete in the trench, leaving 6"-12" of space on top for 1 or 2 courses of earthbags. In other words, you want 1-2 courses of bags below grade.
Step 3
Add several courses of scoria or pumice-filled bags to prevent moisture from wicking into upper courses. This also creates a frost-protected foundation. Filling one bag at a time about 3/4 full with gravel and tuck the end underneath. Tamp and level the bags after each course is complete.
Step 4
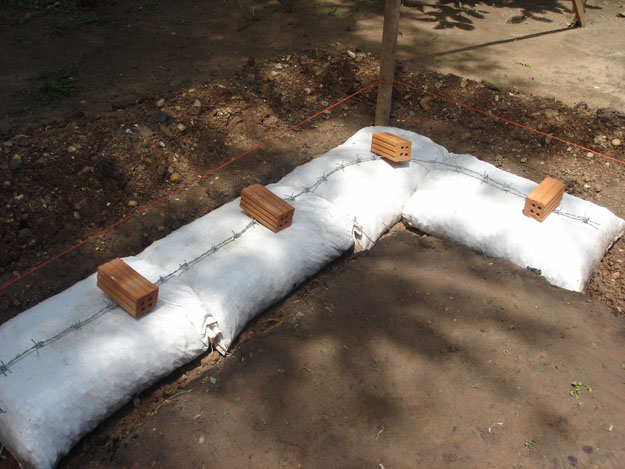
Add 4-point barbed wire between each course for tensile strength. One strand may suffice for vertical walls on a small home. Two strands are recommended for domes and vaults. Extend the wire about 18" extra and connect with tie wire (baling wire). For Option B (see step 8) add barbed wire as shown in photo: one strand is for tensile strength; the snaking wire ties walls together.
Step 5
Use a metal slider to help place bags on top of barbed wire. This allows you to align the bags correctly. Once the bag is aligned, hold it in place and pull the slider out with a quick motion.
Step 6
Add the door form(s) on top of the earthbag wall. This is usually placed 6" above grade. Install it plumb and level. The form can be built out of scrap wood.
Step 7
Start adding remaining courses of earthbags using either Option A or B as explained in the next step. Use a 'bucket chute' (plastic bucket with the bottom cut out) as a funnel to help fill bags. Tamp bags solid after each course is complete, making sure walls remain plumb, straight and level. (If you're building a dome, make sure each course is round.)
Step 8
Here are two methods of insulating earthbag homes:
Option A: The simplest, most straightforward method is to fill earthbags with an insulating material. Scoria, pumice, perlite, vermiculite or rice hulls will all work. Option B: Insulate soil-filled earthbag walls with 10" tube sandbags filled with insulation. ( Tube sandbags are typically used to improve automobile traction on snowy/icy roads.) This method creates a double wall with insulation on the outside, thermal mass (soil) on the interior.
Step 9
Install window forms at the appropriate level. You can make wood forms from scrap wood, or use barrels, tires, wagon wheels, steel culvert pipe, etc.
Step 10
Add remaining courses of earthbags, always checking for plumb, straight and level. Ideally, the top course of bags is level with the top of your doors and windows. This eliminates the need for lintels.
Step 11
Add a bond beam to structures with vertical walls. This can be made of reinforced concrete or wood. It must be strong enough to support the roof and other loads from snow and wind. Domes do not require bond beams. You can continue stacking courses until completion.
Step 12
Build the roof and install doors and windows. Wide roof overhangs (approximately 36" or 1 meter) will help protect the walls.
Step 13
Plaster the walls with earth or lime plaster, depending on the climate and situation. Earth plaster is recommended (interior and exterior) for walls protected by roof overhangs. Domes require more protection: lime plaster, or a thick 'reptilian-like' shell of stabilized earth, or a living roof.
Tips & Warnings
- Buy recycled bags in good condition or misprinted bags to save money. Typical bags measure 18"x30" when empty.
- Fill the bags on the wall to reduce labor.
- Two-gallon buckets are the perfect size for filling bags.
- To help maintain level, use the same quantity of fill material in each bag (example: 4 buckets of earth).
- If money is really tight, fill bags nearly full and stitch bags closed so fewer bags are needed.
- Use twine attached to a center stake to guide the circular shape of a dome. This is simpler than complex steel guides. Check each course as you go.
- Domes also require a second stake with twine to guide the dome curvature.
- Start out with a small, simple building to learn the techniques.
- Arched door and window openings look best and are inherently stronger than rectangular openings.
- While you could obtain fill soil by digging on-site, having it delivered by the truckload will save countless hours of hard work. Most subsoil will work. Earthbag builders are using road base, reject fines, adobe soil or fill dirt.
- The best soil has a mix of about 25% clay to 75% sandy soil. Don't worry if the mix isn't perfect. It's easy to add extra sand or clay to get the right mixture.
- Don't add too much water to the mix, just enough so the walls are solid. If water is squishing out the bags, then reduce moisture content.
- For disaster prone areas, you can reinforce the building with 1. poly strapping that runs under the bottom course and up and over the bond beam (cinch with a strapping tool), 2. plaster mesh (for extreme situations you can add to both sides of walls and tie together), 3. hurricane ties, 4. stabilize the soil with 10% concrete or lime
- Vaults are difficult to build. Use other methods or keep them small.
- Protect earthbag walls from sunlight with tarps during construction.
- Build round domes. Elliptical domes are inherently unstable.
Owen Geiger, Director of the Geiger Research Institute of Sustainable Building and Kelly Hart have teamed up to create EarthbagBuilding.com and Earthbag Building Blog at naturalbuildingblog.com to better focus and keep track of the rapid growth of this novel building method. |
