| Openings in Walls: Reinforcement, Lintels, Window Grills, Vent Block & Pipe |
|
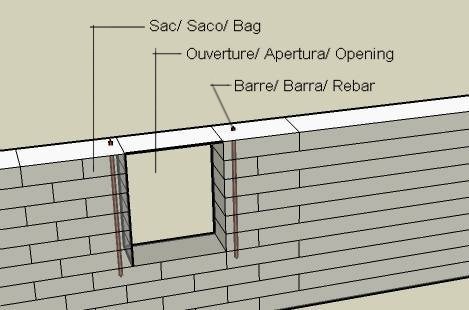
Rebar reinforcement at openings Pier reinforcement near openings Nailer plactes to attach frames and stud walls Anchor bolts to attach frames and stud walls Wood lintel for hot/ humid or temperate/ humid climates These general construction techniques are chosen to introduce low-tech and low-cost construction. Combined with good quality control, they can create buildings strong enough to survive hurricanes and resist earthquake damage. Good quality construction includes: • plumb and level walls • adequate tamping • strong bags • correct soils • appropriate building dimensions • maintenance of exterior plaster layers and roofs Engineers or expert earthbag builders may be able to make specific recommendations better suited to your site and building. This information is intended for small single story houses built of 38 cm (15") wide walls of 50# bags filled with an earth mix containing some clay. Earthbag is very strong in compression (carrying loads) but can benefit with additional reinforcing bars in key locations, including the edges of all wall openings. All earth-filled bags at doorway openings should have the opening end tamped well in addition to the top. Place neater ends of bags facing toward opening to simplify plastering. Locate openings or adjust bag size near opening to allow 30 cm (12") long bags at opening edges minimum. Use wood, metal, or strawbale opening forms to allow adequate tamping without deforming edges of openings. All rebar should be at least #4 (1/2") diameter. Clay-rich cob building techniques can be used to add trim to building elements including the edges of openings. Metal or plastic mesh can make earth decorations stronger. REBAR REINFORCEMENT AT OPENINGS Materials: Rebar
Sac/ Bag: Face bottoms of bags to openings. Ouverture/ Opening: Keep edges of bags straight and plumb. Linteau/ Lintel: Level of the bottom of the future lintel. Barre/ Rebar: Drive a rebar 30 cm (12") longer than the height of the window opening through the bag wall. Drive it vertically through the center of the smallest bags along the opening edges. For a door use 2 rebars 1.2- 1.5 m (4'-5') long overlapped 45- 60 cm (18- 24"). For a poured concrete lintel leave rebar extending 10 cm (4") up into concrete. For a wood or corrugated metal lintel drive rebar through hole in lintel and bend tip over to pin lintel in place. PIER REINFORCEMENT NEAR OPENINGS Materials: Extra bags and barbed wire
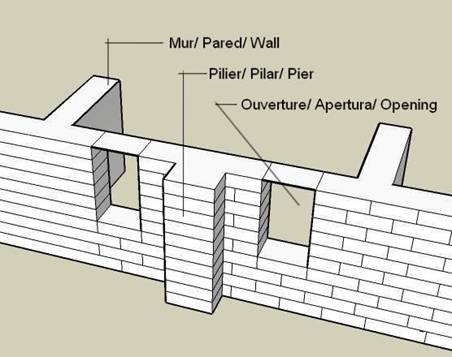
Mur / Wall: A window or door within 50 cm (19") of an intersecting wall does not need rebar reinforcement. Pilier/ Pier: A window or door within 50 cm (19") of a pier does not need rebar reinforcement. Ouverture/ Opening: Unreinforced openings must have 1 square meter of wall cross section between them. In 38 cm (15") thick walls two openings can be located 50 cm (19") each side of a pier that is 50 cm (19") wide and juts out 38 cm (15") from the wall. Piers, buttresses, or interior walls must have bags overlapped to connect well to walls. Extend barbed wire from walls into piers and buttress. METAL FRAME REINFORCEMENT
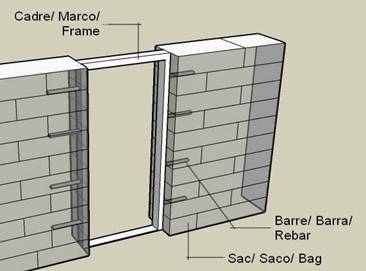
Materials: Metal frame, rebar Cadre/ Frame: Brace a sturdy frame and build bag walls up to it. Barre/ Rebar: Weld 4- 30 cm (12") long pieces of rebar to each side of the frame to be located between courses. Sac/ Bag: Use horizontal braces or additional temporary framework to keep bag ends from bulging past edge of frame when tamped. Drive vertical rebar pins through eye bolts to secure, or use long staples or bent nails hammered into bags to secure rebar extensions in center of bags. WOOD FRAME REINFORCEMENT
Cadre/ Frame: Build a sturdy wood frame as thick as the bag wall. Add temporary horizontal bracing until tamping is completed. Locate bracing so workers can pass through doorway during construction. Sac/ Bag: Lay bags up to the frame. Embed nailer plates (see below) in bags at edge of opening. Use 4 nailer plates (see below) or anchor bolts per doorway side, 2 per window side for small windows, or 3 per side for windows taller than 60 cm (24"). NAILER PLATES TO ATTACH FRAMES AND STUD WALLS
Materials: Plywood, Nails, 5x10 cm (2x4 inch) Sac/ Bag: Keep bags near openings or wall ends tamped firmly. Fil de fer/ Wire: Continue barbed wire between bag courses to doorway or nailer plate. Plaque/ Plate: Screw a 30 cm (12") long piece of 5x10 cm wood (2x4 inch) to one side of a 30 cm (12") wide piece of plywood or sturdy metal plate. Size the plywood or metal 10 cm (4") longer than shortest bags at opening. Clou/ Nail: Tack the nailer well to bags below with 7.5 cm (3") long galvanized nails. Leave some nails sticking up at least 2.5 cm (1") above the nailer plate. Cloutier/ Nailer: Place nailers with 5x10 (2x4) lumber edge exposed. Screw door or wall frames to 5x10 (2x4) end of nailer plate. Nailer plates will be covered by rough and finish coats of plaster. ANCHOR BOLTS TO ATTACH FRAMES AND STUD WALLS
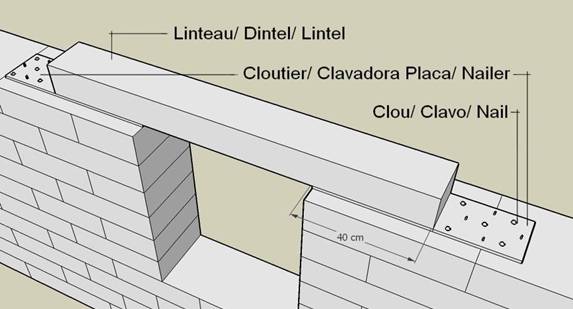
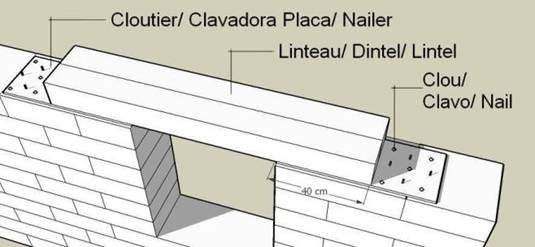
Materials: Galvanized or painted metal plates, threaded rods Metal connectors will not be subject to damage by insects or fungus in hot or humid climates. Plaque/ Plate: Place a galvanized or painted metal strap or a plate 6" long with 2 holes between the 2 bags nearest to the opening. Tringle/ Rod: Insert a galvanized or painted bolt or threaded rod through each end of the metal plate. Use a washer and nut to fasten rods to door, window, or wall frame. Fil de fer/ Wire: Lay barbed wire every course to the end of the bag row. Sac/ Bag: Set small end bags between rods. Note: Locate opening so small end bags will not be smaller than 30 cm (12"). ABOUT LINTELS AND ARCHES Openings in earthbag buildings are simpler to build in an earthquake resistant manner if they are limited to 60- 80 cm (24- 31") width. A lintel must be sturdy enough to support the weight of the heavy earthbag wall material and the portion of the roof that is supported above the opening. Size lintels for the: • Length of span • Weight of wall material and bond beam above • Proportion of total roof weight resting above the opening • Live loads on roof and walls A lintel in an earthbag wall may need to be stronger than a lintel used in a sand-cement CMU wall or a double withe (double thickness) brick wall. Because the walls are thick, the earth in a square face meter (2' x 5'-5") of a 38 cm (15") thick earthbag wall alone can weigh 150- 180 kg (330- 400 pounds) without considering the plaster and wire. A lintel for a 38 cm (15") wide wall should be at least 30 cm (12") wide. Plastering is easier if the lintel is the full width of the wall. Construction is easier if the total height of the lintel is a multiple of the height of a bag course: 12.5 cm or 25 or 37.5 cm (5 or 10 or 15 inches). Unless the lintel is to remain exposed from the opening beneath, add mesh to the top of the opening to help the plaster adhere to the upper opening surface. An arch can be built of unstabilized or cement stabilized earthbags. Arches require rounded forms, a lot of care, and a skilled builder. See other resources for arch design and construction techniques. In wet climates window sills and door and window jambs can be subject to leaking from wind-driven rain. Overhangs and/ or extended drip edges that protect windows and doors can be helpful. Place door and window frames near the exterior side of walls. Provide sloping exterior window sills of stone or cement or tile. If an earthbag building is finished in earth or earth and lime plaster, use a waterproof gasket above a layer of fired bricks supporting a window sill. If cement plaster is used, metal or reinforced concrete lintels may be best. WOOD LINTEL FOR DRY CLIMATES Materials: Wood, Plywood, Nails
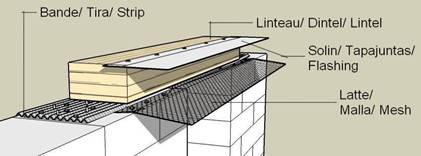
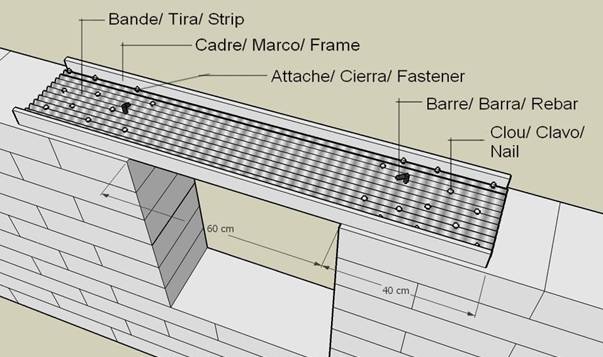
Cloutier/ Nailer: Nail or screw a plywood or metal nailer plate 75 cm (30") long to the lintel. Or secure each side with vertical rebar through the lintel. Linteau/ Lintel: Use solid timber, a built up lumber beam, a laminated beam or box beam, or multiple poles sized for the weight the lintel will carry. Lintel must extend 40 cm (16") past the opening on each side. Clou/ Nail: Hammer 7.5 cm (3") long nails through nailer plate into well-tamped earth-filled bag. Leave several nails sticking 2.5 cm (1 inch) above nailer plate to hold next earthbag in place. Note: Exposed structural wood may be subject to attack by insects and rot in hot or temperate humid climates. See next page for alternate wood lintel detail for wet climates. WOOD LINTEL FOR HOT/ HUMID OR TEMPERATE/ HUMID CLIMATES Materials: Wood, plywood, nails, metal flashing, sturdy plasterer's mesh Wood structure must be protected against insect attack and rot in hot and humid regions. If cement or metal lintels are not available, encase wood in a generous layer of clay plaster and provide good drip edge to keep it dry. Earth plaster reduces humidity, but cement plaster attracts moisture instead and accelerates wood decay.
Step 1: Bande/ Strip: Nail or screw a corrugated metal nailer strip 75 cm (30") long to the lintel. Linteau/ Lintel: Recess lintel 10 cm (4") from exterior wall. Use solid timber, a built up lumber beam, a laminated beam or box beam, or multiple poles sized for the weight the lintel will carry. Lintel must extend 40 cm (16") past the opening on each side. Solin/ Flashing: Cover lintel with metal flashing that extends past each end and is wide enough to cover the outside edge of the lintel. Latte/ Mesh: Lay mesh under the lintel and attach to the exterior edge of the bags beneath. Alternate fastening: place lintel on layer of fired bricks and drive a 1.2m (48") long rebar through a hole in the lintel on each side of the opening.
Sac/ Bag: Step earth-filled bags gradually out to meet plane of wall. Solin/ Flashing: Bend flashing to create drip edge and protect ends of lintel. Latte/ Mesh: Fold mesh up and attach to lintel. Plâtre/ Plaster: Encase exposed wood in fiber-reinforced clay-rich plaster. METAL LINTEL Materials: Wood, Plywood
Cadre/ Frame: Hollow rectangular cross-section tubing forms a bond beam in the center of the bag wall. Barre/ Rebar: Tie the frame to earth-filled bags with 60 cm (24") long rebar hammered through holes in the frame. Bend end of rebar over. Linteau/ Lintel: Place more rectangular cross-section tubing next to the bond beam frame. Size the tubing for the span and the weight that the lintel must carry. Trou/ Hole: Alternate threaded rods extending upward between bags with rebar hammered downward into lower bags through holes every 30 cm (12"). Clou/ Nail: Drive nails through three holes minimum each side of opening, or bolt lintels to bond beam. Note: If window sill is lower than bond beam or bond beam is of a different type, use three metal lintel beams of the same length. CORRUGATED LIGHTWEIGHT LINTEL Materials: Corrugated metal strip, angle steel or aluminum, nails, rebar
For use with 60 cm (24") maximum width windows placed between roof rafters or under concrete bond beam. Bande/ Strip: Cut corrugated metal 35 cm (14") wide. Cadre/ Frame: Use angle steel or aluminum of a large enough size to support the courses of bags and bond beam above. Attache/ Fastener: Bolt or screw metal frames to corrugated strip. Barre/ Rebar: Pierce corrugated metal with 60 cm (24") minimum length rebar driven into bags below. It should extend to at least 30 cm (12") below the window. Clou/ Nail: Drive 7.5 cm (3") long nails through corrugated metal into bags. VENT BLOCK TRANSOM & PANEL Materials: Ventilation blocks (or brick or tile with mortar for openwork), wood or metal lintel, tile or stone sill
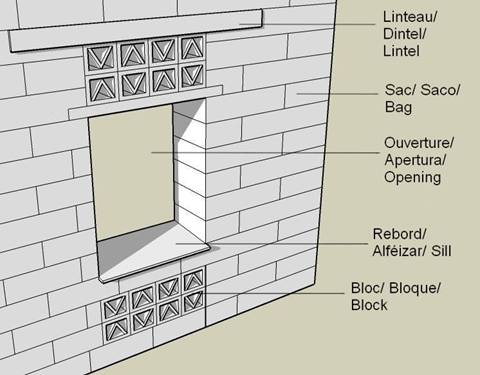
Linteau/ Lintel: The lintel is placed above the transom to distribute weight to the bag walls. Ventilation blocks or openwork of brick or tile are not very strong. Sac/ Bag: In earthbag walls keep openings or vent block panels at least 1m from corners or other openings. Ouverture/ Opening: For ventilation in hot climates tall and narrow openings work well in earth walls. Panels of vent block allow increased area for ventilation with some horizontal wall reinforcement. A smaller lintel or a separate frame can hold up openwork in the transom above the window because it will not bear the weight of the wall above. Rebord/ Sill: A sill that extends past the wall surface can reduce rain infiltration somewhat into openings below. Bloc/ Block: Vent blocks or openwork patterns of tile or brick can callow ventilation but provide security and reduce views in. Use tarps or screens and/ or curtains inside. WINDOW GRILL Materials: Rebar, nails Sac/ Bag: Build edges of opening neatly. Barre/ Rebar: Lay rebar horizontally between bag courses. For added security or if exterior mesh will not be used on walls, pin rebar in place with big staples or with nails placed on the exterior side and bent over. Ouverture/ Opening: Openings wider than 60 cm (24") may require vertical grill work as well as horizontal. Linteau/ Lintel: This is the level of the bottom of the lintel. A simple way to provide security but allow breezes and light to enter.
Materials: Plastic or metal or tile pipes, clay plaster, optional screens and wire. Sac/ Bag: Place shorter earth-filled bags between vent pipes. Pipe/ Pipe: Center pipes above bags. Pipes must be long enough to extend past interior and exterior plaster layers, and protrude 2.5 cm (1") minimum on exterior. Dedans/ Interior: The pipes must slope up towards the inside. Plâtre/ Plaster: Raise the inside of the pipes and fill gaps with the thickened clay plaster that will form the first plaster coat. In humid areas vent pipes near the floor and near the ceiling allow better air circulation and may reduce mold growth. Vent pipes can have screens fastened around them with wire on the exterior side to prevent insects and animals entering. LIGHT BOTTLES
Dedans/ Interior: Place nested bottles or glasses flush with both wall surfaces. Bouteille/ Bottle: Use larger bottles on the outside and pack with clay-rich plaster to prevent animals or insects nesting in exposed pockets. Sac/ Bag: Use bottles at bag joints, but do not replace more than 25 cm (10") length of wall with bottles. Continue barbed wire above and below bottles. Unless earthbags are stabilized with cement, alternate regular courses of bags with courses that have bottles added.
Since the bottles and clay infill are much thinner than the bag walls, a light-filled shelf or niche will result.
|
 Materials: Wood frame, nailer plates
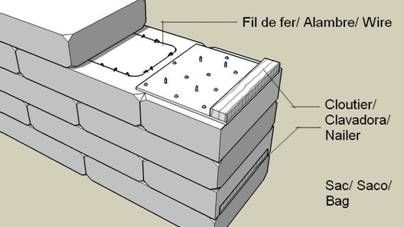

 Step 2 (Cross-section):
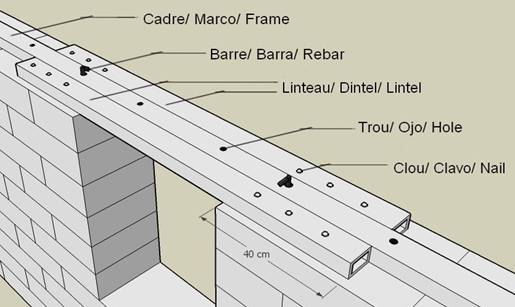


 Materials: Glass bottles and jars, clay plaster.
 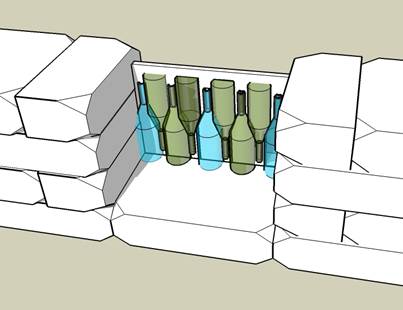 If more light is desired than ventilation, glass bottles can also be anchored with clay-rich plaster inside a wall opening. Fill the spaces around the bottles with thick fiber-reinforced clayey earth. Use a standard lintel above.
