Completing the Top of the Dome
As you close in at the top of the dome, it becomes more necessary to angle the folded end of the bag to adapt to the increasingly tight angle of the circular course. This is fairly easily done just by arranging the contents of the bag to make that angled shape. While working on the conical top of the dome, one can actually climb around on the outside like you would on a small mountain. Notice that I have kept the bottom part of the dome tarped to keep off the sunlight, since it isn't plastered yet.
|
|
|
The Final Bags!
This view is looking up at the top of the completed dome from inside. If you want to place an air vent here (which is a good idea), then those last few bags can be moved over a bit to make room for it. I used 6 to 8 inch (15 to 20 cm) PVC pipe for this purpose, and then eventually use a tether ball for a vent closure. |
Releasing the Arch Form
Once the bags are stacked over the arch, then the form can be released. As mentioned earlier, it helps to have the form shimmed into place so that the shims can be easily knocked out to drop the form down and be able to pull it out.
|
|
|
Look Ma, No Form!
It is always amazingly pleasing to release the form and see the arch standing all by itself. |
Applying Plaster
Finally the time has come to put plaster over the earthbags. This could be done to some extent as you go along, but in many ways it is easier to wait until all of the bag work is done, and do the plastering as final step. We chose to experiment with papercrete (re-pulped paper mixed with Portland cement and sand) as a plaster, and this has worked out well, at least in our rather arid climate. The papercrete adds to the insulation value of the wall. Other possible plaster materials for the outside of the dome are common cement stucco and stabilized earthen plasters. While the papercrete absorbs moisture like a sponge, the dampness never migrates to the inside of the dome. Other plasters may require that a moisture barrier (such as polyethylene sheeting) be draped over the dome before applying the plaster, and then using a stucco netting to reinforce the plaster.
|
|
|
Working around the Windows
Here I am plastering around one of the round windows, getting ready to actually install the glass. Above the window you can see the ends of the joists sticking through the bag wall, flush with the outside. These wooden parts will be plastered over along with all of the bags. In some cases, I put a wood preservative or sealing coat over the ends of the wood, just to make sure that they don't absorb too much moisture and tend to rot over time.
|
Fitting the Glass
While the plaster is still wet, I placed the glass I intended to use for the window over the opening and scored around the perimeter of it with a trowel edge to indicate where the glass will need to fit. The glass I used was obtained at glass shops as seconds or glass that they wanted to sell cheaply because it was cut wrong or nobody picked it up. Most of this was "thermalpane" (two layers of glass) for better insulation. In some cases the seal between the panes allowed moisture to enter the glass, but mostly these have held up OK.
|
|
|
Preparing the Plaster to Accept the Glass
Using the score line, I remove enough of the wet plaster to be able to recess the glass into this cavity. It may take several times of placing the glass there to make sure of a good fit. Once you are satisfied that the glass will fit, you can let the plaster set up before actually installing the glass; this will give the glass a firm base to sit on. With Riceland, I did two applications of plaster, so that when I did the second coat, I overlapped the glass with the new plaster on the top and on the two sides. The bottom was left flush with the original coat so that water would run off...sort of like shingles are set. |
Finishing the First Plaster Coat
Plastering is an activity where help is always welcome. It doesn't take much experience to be able to do it, and it can be a fun social affair.
|
|
|
Vents and Completed Window
Here you can see the air vent at the top, complete with its bonnet to keep rain from entering. This can also be screened to keep insects from coming in. A stainless steel insulated wood stove vent is below the top vent. Also you can see how the final coat of plaster overlaps the window to shed water. Inlet air vents can be arranged strategically at lower levels...this should be done while the building is in progress. |
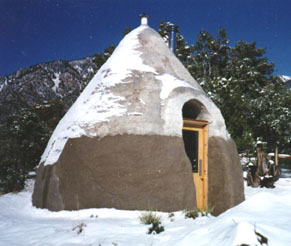
Completed Dome!
We started building Riceland during the summer, and by the time the snow was flying it was snug and cozy inside. |
|
|
Adding Color
A final color coat can be applied, either by using conventional cement stucco methods, or by painting the plaster. I used a pigmented lime wash stabalized with latex on the papercrete at the left.
|