This Emergency Shelter design is the result of a collaboration between Kelly Hart and Dr. Owen Geiger. We came up with this design in response to a plea from aid agencies operating in Pakistan after the 2005 earthquake there. The challenge was to provide quick, safe, decent shelter with minimal tools and supplies to sustain life through the winter. Access to remote areas was extremely difficult, since many roads ad been destroyed or blocked by landslides. Because of these and other difficulties, and the fact that winter will create a much more dire situation, fast easy-to-build temporary shelter seemed most appropriate.
 Disclaimer: The safest option against future quakes is to build permanent houses designed by engineers and architects, with properly reinforced foundations, walls and roofs. However, since time is of the utmost importance, emergency options such as the proposal outlined here need to be considered. Options for turning this temporary shelter into safer, permanent housing are examined below. Disclaimer: The safest option against future quakes is to build permanent houses designed by engineers and architects, with properly reinforced foundations, walls and roofs. However, since time is of the utmost importance, emergency options such as the proposal outlined here need to be considered. Options for turning this temporary shelter into safer, permanent housing are examined below.
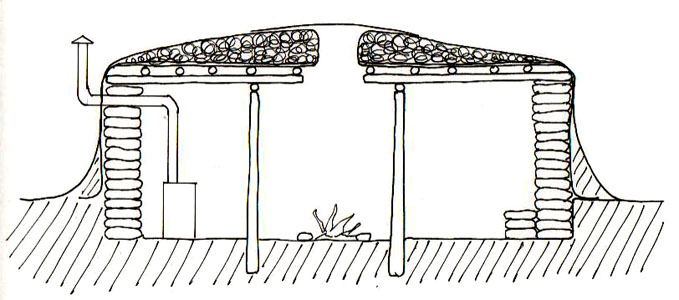
Overview of the design: This design incorporates a round, earthbag structure partially inset into the ground. Rice bags or sandbags are filled with local soil and tamped in place to create the walls. The roof is built with poles salvaged from destroyed buildings, covered with straw, grass, leaves or whatever is available, covered with plastic sheeting or tarps, and bermed with earth to hold in place. The size can vary according to local needs, and therefore dimensions are not shown.
Labor: 90 hours, not including plastering. For example, this structure could be finished by 5 unskilled workers working 6 hours a day for 3 days.
Cost: Approximately $100 US dollars, plus barbed wire, and tarps or plastic sheeting. This assumes salvaged doors, windows, woodstove, stove pipe, etc.
Building options:
- Add two strands of 4-point barbed wire between each row of bags about 4-inches from the edge, if available. At a minimum, tie every three rows of earthbags together with baling twine or equivalent.
- Excavated soil can be used to fill the earthbags. They can be tamped by stomping each row with feet if a tamper is not available.
- If available, lightweight volcanic rock such as scoria will create a highly insulated structure.
- If available, place lengths of baling twine perpendicular to the walls between each row of bags to attach stucco mesh in the future.
- Pin wood lintels over door and window openings.
- Use recycled doors and windows when available.
- Windows could be made of adobes set in an angled grid pattern and covered with clear plastic sheeting. Alternatively, just plastic sheeting could serve as temporary windows. If so, two layers are recommended to conserve heat - one on each side of the wall.
- Full-length poles (of adequate size) that span the entire diameter are preferred. These can be pinned to the earthbags with rebar to resist slippage in the event of another earthquake.
- If shorter poles are used, it is important to fasten them together securely. Bolts and washers are recommended instead of nails, which can more readily pull loose and collapse in seismic events.
- Tar or char the base of any wood posts.
- Slope the roof insulation to shed snow and rain away from the building.
- Earthbags must be protected from sunlight with tarps or plastic and plastered as soon as possible.
- One large tarp or piece of plastic sheeting covering the entire structure would reduce leaks.
- Moisten and tamp the earth to create an earthen floor.
- An efficient woodstove is the recommended heating and cooking source. Alternatively, a smoke hole in the roof (with a removable cover) could be added to accommodate a fire pit.
 This is a cutaway view of what an interior section of the structure might look like. This is a cutaway view of what an interior section of the structure might look like.

This shows an alternative roof structure that would require a continuous top plate bond beam, or a tension ring made with wire or cable.
There are numerous ways to turn this temporary shelter into safer, permanent housing:
- If at all possible, add a steel reinforced concrete bond beam along the top of the walls.
- Add stucco mesh to each side of the walls and coat with 2 or 3 coats of plaster. Plaster as soon as possible, because the bags will degrade in sunlight. Earthen plaster is best suited for interior use, but can also protect the outside of the walls if regularly maintained.
- Benches along the interior and exterior of walls will help reinforce the structure.
- Optional loft or second story: The earthbag walls could be extended and a wood floor added.
- Permanent roof options: These include a conical roof made of poles; a domed "basket" of woven saplings; wood trusses; or a hexagonal or octagonal roof made of poles or milled lumber. Add durable roofing.
- Ceiling insulation: Most heat loss will be through the ceiling, so it is important to add adequate ceiling insulation. Wool, cotton, straw, and scoria are all suitable. |
