| A Garden Shed in Belize by Jesse Loving |
In planning to build an earthbag house in Belize, Central America, I decided to first build a smaller structure so that I could teach myself the process, learn from my mistakes so as to avoid making such mistakes when applying the technique to a large living space and, finally, so that I would have a place to store all the tools and equipment I would need onsite to actually build a mud house.
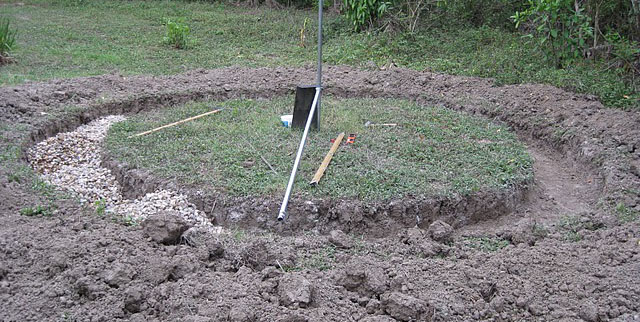
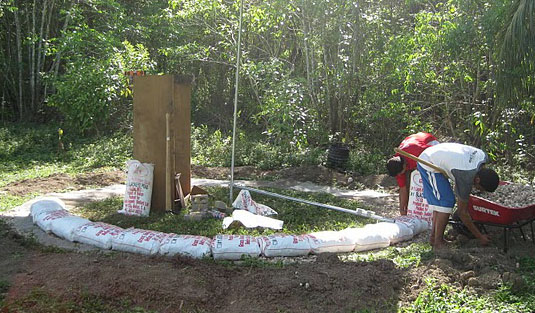
Digging & filling a 12' diameter rubble trench foundation . The metal pole in the center is an articulating compass, which will assist us in keeping successive rows of earthbags level & plumb.
The first row of bags in place. The bags in this row are filled with gravel. The gravel-fil led bags act as a solid and stable foundation - a continuation of the rubble trench up into the structure of the walls - as well as a capillary break that prevents ground moisture from wicking up into earthen walls.
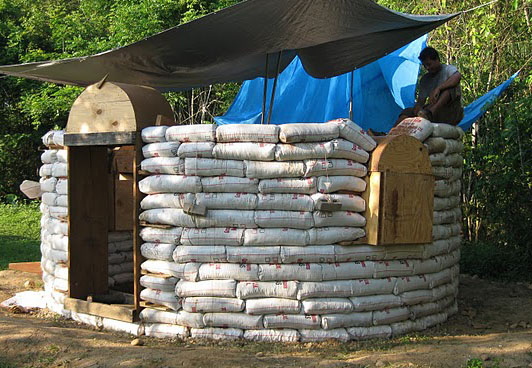
The first four rows are up. You can see the temporary door form on the right. It will be removed later, but for now maintains the integrity of the circle while creating a space for the door. In the foreground you can see 4 protruding wooden forms. They will eventually support a bench built directly into the wall. This photo represents a point at which very few mistakes had been made. If I could go back in time to apply all I have learned about building with earthbags to this structure, I would go back to this moment.
8 Rows up with arched window forms in place. You can see on the right side, against the door form, that the wall is starting to bow outward. It's not plumb. Navigating large linear box forms in a relatively small diameter round building was more challenging than I had anticipated. The walls ended up bowing outward wherever they abut a box form. While difficult to explain this trend here, I have since learned how to avoid the problem.
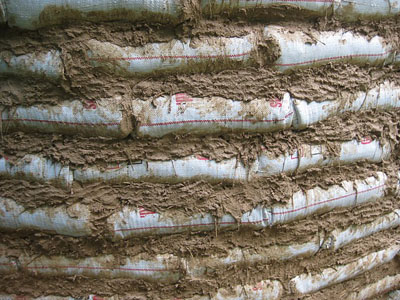
The bags are polypropylene grain sacks. I bought them from a granary at a large discount because they are misprinted . The bags are filled with a moist sand and clay mix that sets up like concrete when cured.
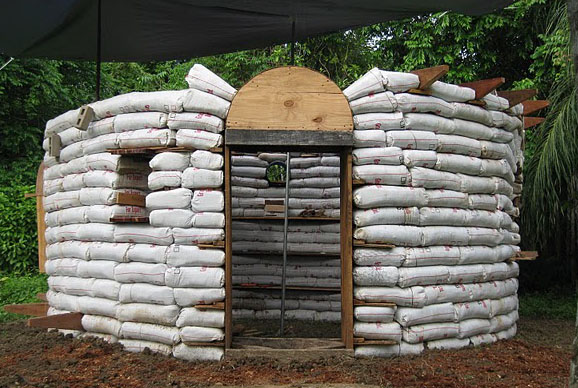
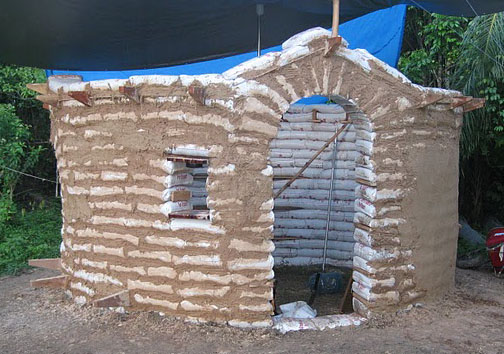
It was a mistake to build a structure out of mud during the rainy season. The building didn't suffer the moisture, but we did - sloshing around in what became a mud pit, constantly wrestling with tarps that never worked as well as we would have liked, and were always in our way. Walls are getting higher and we are beginning to place fanbags for the roman arches. We could have had a better running bond with the bags, but we did all right. Here we graded the skirt around the building so that moisture would run downhill, away from the structure. It was also at this point that I struggled with how to attach the roof to the walls. I opted to make some wooden eaves upon which roof rafters would sit, but they ended up being unnecessary as we will soon see.
We removed the window form out of pure excitement , but it too was a mistake as the fill hadn't yet cured and the exposed ends of the fanbags developed sagging pockets of loose fill.
Applying the first coat of sand and clay plaster. We should have applied it thicker, so that the mud extended beyond the bag bulges about an inch, leaving no concavitie s. The way we did it produced large pockets of heavy, wet mud in the second coat that occasionally fell from the wall, as well as visual rippling caused by the trowel following the contours of the wall. Beginning of the second coat of mud plaster. You can clearly see the rippling effect I mentioned earlier.
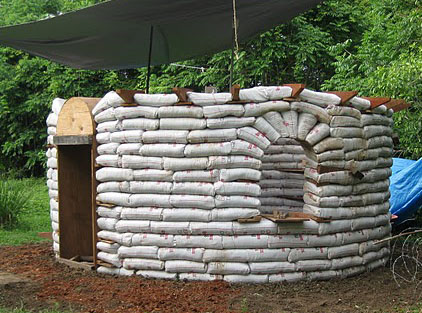
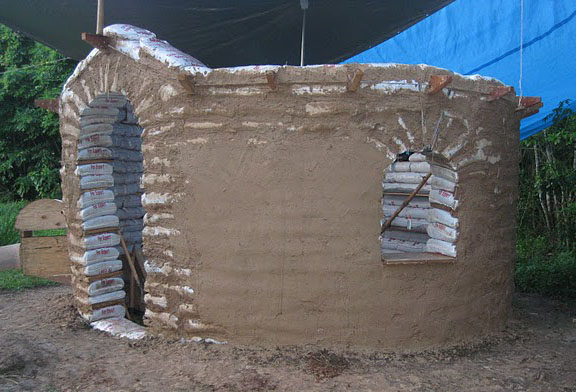
In my angst about the bowing-out of the walls, I decided to reinforce the structure by running a heavy duty cable around the top perimeter (visible in this photo). This is a high tension cable that was run through the eaves and attached to a tightener in the back. I do not know if this made the structure more stable. In the many hours in which I have contemplated the structural integrity of a circle, I am convinced that this structure, despite its bowing walls, is secure from collapse. With the nature of a circle, and the way each bag is tied into the entire structure (not just the bags below or on top of it), the only way a wall or a section of a wall can collapse is if the entire structure fell over with it. That just is not going to happen. This structure utilizes 25 tons of earth and there is no way that a few poorly aligned bags are going to pull 25 tons of earth to the ground with them. Getting ready to mud the window frames in place. Designing the window frames and building them ourselves was no picnic - especially concerning the arches. I am no carpenter, and do not have the right tools. Time and time again, it was the carpentry aspect of the project that confounded me the most. I have developed a great respect for good carpenters and carpentry.
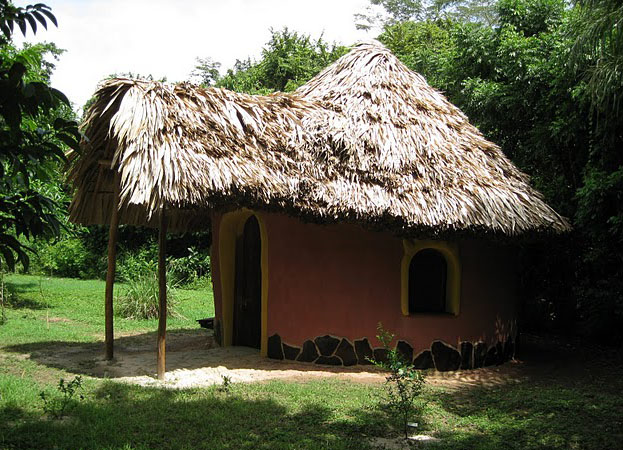
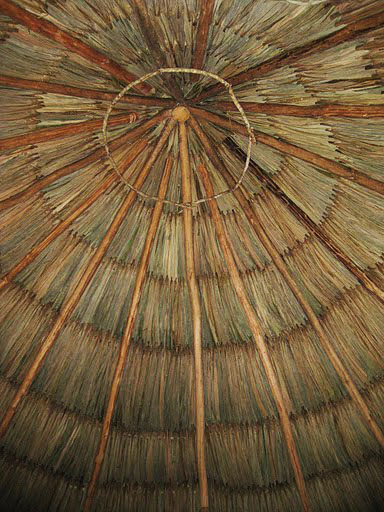
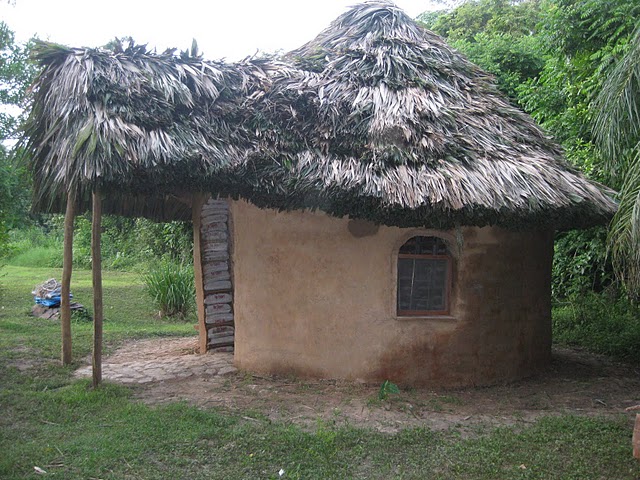
Thatching is a great art & it is becoming lost. Some of the most renowned thatchers in Belize live right down the road from me and I hired them to thatch the roof. It's an 80 year old guy, his son, and nephew. They have thatched some of the best guest lodges in the country. This project was little for them, and I believe they finished it in 3 days. This roof cost more than the entire rest of the building combined. The Bay leaves and hardwood poles that were used in the roof construction were all harvested locally and sustainably with proper government issued licenses.
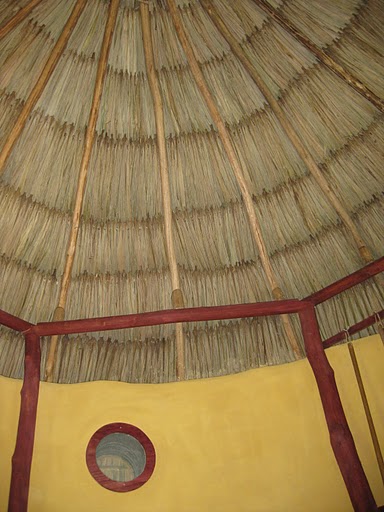
First plaster coat on interior walls. Here you can see the ultimate cost of my biggest mistake - erecting walls that are not plumb. The thatchers, having never seen an earthbag house before, not trusting the load-bearing capacity of mud, and believing beyond doubt that my bowing walls were going to fall over - insisted on building the roof on support posts (visible here), thereby relieving the walls from having to bear any weight at all. Ultimately , the roof is not connected to the walls at all, and we simply mudded the gaps between them. I really struggled with this solution. I still believe that the walls could support the weight of this roof. It's just one of those things: my inexperience, combined with a fear of potential architectural catastrophe, combined with utter disbelief from an experience dsubcontractor . . . I had to chalk it up to a learning experience and the inevitable costs of jumping into something after only ever having read one book on the topic.
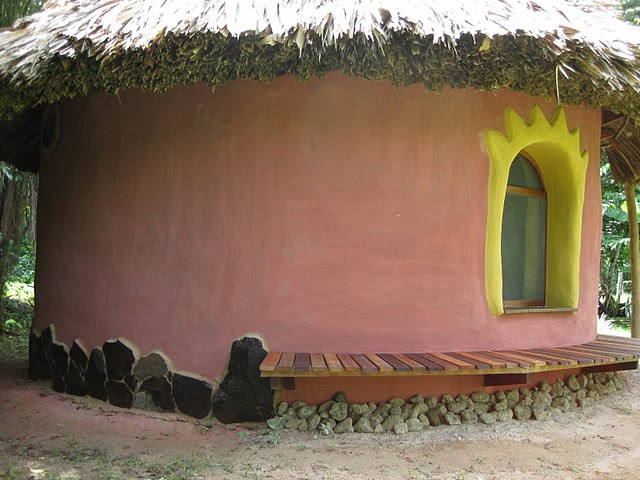
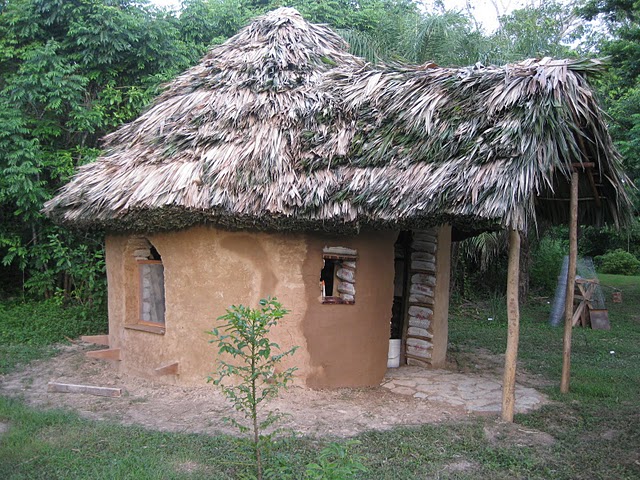
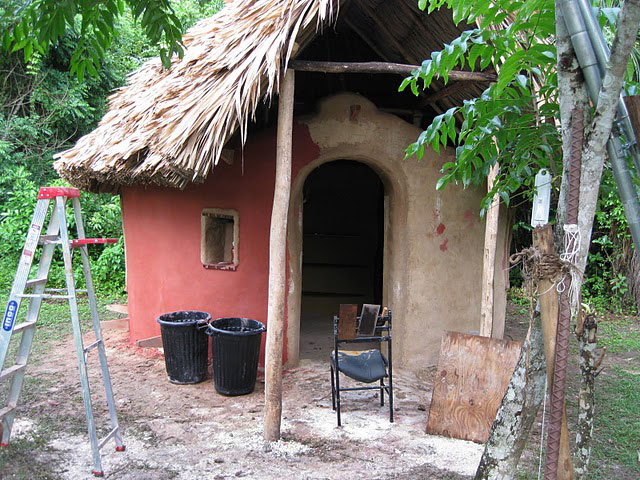
Second coat of mud plaster on, thatch roof on, windows mudded-in, and green flagstone ramp installed. The portico was an afterthought and not part of the original design.
The rear of the building took ages to dry, tucked away as it is on the edge of the jungle, exposed to little sunlight or wind. Mold ravaged this wall. earth builders typically use borax in their plaster to prevent mold, but I could not find any in Belize. We have since brought borax with us from America and it works exceptionally well at preventing mold. I will never plaster again without it.
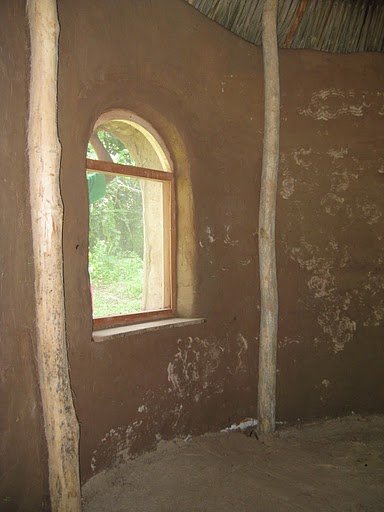
Workmanship is not always a highly regarded quality in Belize. It's a luxury most people cannot afford. I was often frustrated by my helpers' poor attention to detail and get-it-done-quick approach. Every morning I would pick them up and ask, "Are we assholes or artists?" To which they would humor me with a chuckle. This window was designed and sculpted by a 17 year old who, at the end of the construction of this building, turned to me and said, "You know what? We are artists." That alone may have been the most gratifying part of this whole experience. In the same vein as Zen & the Art: We are not building a shed, we are building ourselves.
Locally harvested white marl is a white sand and clay mix that will be used as a base for a colored coat of plaster. Plastering the finish coat. I was going for a terra cotta color, but settled on red (that cured kinda pink).
Being a shed, I opted not to install electricity, so the interior gets quite dark as evening approaches . Although a small building, approximately 113 square feet, and separated from outside temperatures by only window screens (no glass or shutters), the inside temperature consistently registers 8-10 degrees cooler than the outside. Such is the thermal performance of thick earthen walls and thatch.
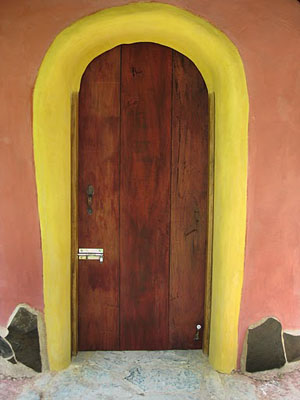
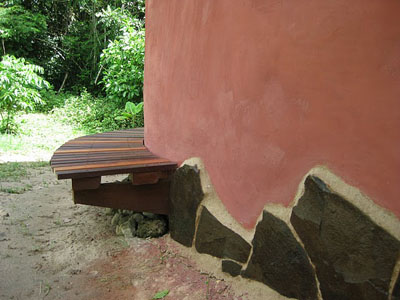
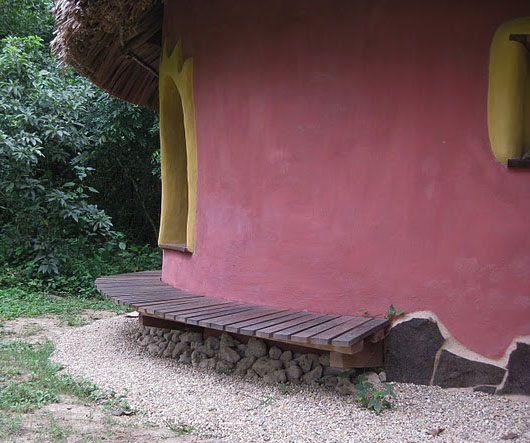
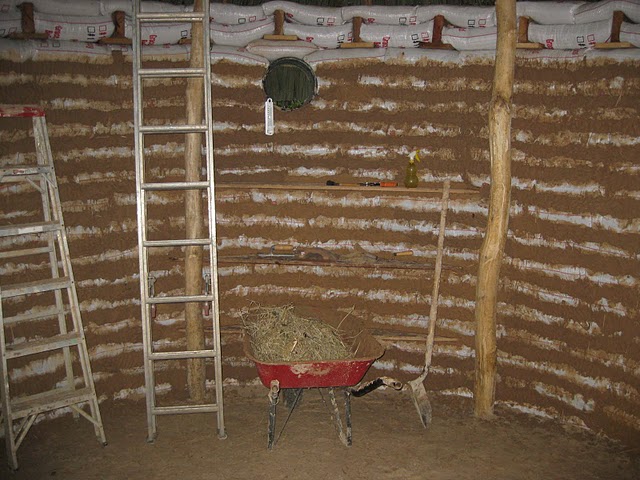
Built-in bench, river stone, and flagstone splash-guard detail. The splash guard protects the earthen walls from splash back created by water falling off the roof. here you can also see our handmade door.
Splash guard detail. Again, using only clay and sand as the mortar. These flagstones are pretty heavy and I am very impressed by the strength and binding capacity of mud.
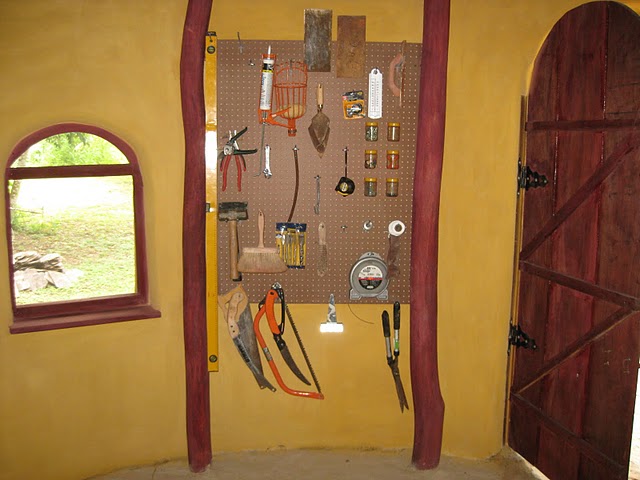
Inside final plaster coat detail. After staining the posts and window frames cherry, the interior plaster just popped. It is, after all, a tool shed.
By mass, this building is 99.9% biodegradable. With its principle components being clay, sand, water, wood, and leaves - I believe it is a good example of natural building. There are some nails, screws, joist hangers, window screen, and a synthetic wood stain . . . . but by and large this building is eco-sensitive, inexpensive, built by inexperienced hands, with local labor and local materials. It will stand for a long time, provides non-mechanical temperature cooling, and is aesthetically pleasing. No forest cover was cleared for construction and the building blends well into its natural environment. No concrete was used, there are few, if any, petroleum-based products used, a very small amount of fossil fuel was used to transport materials, and very little electricity was used to charge a wireless drill and make a few cuts with a circular saw. It was a great experience, and the blueprint for a larger home design.
|


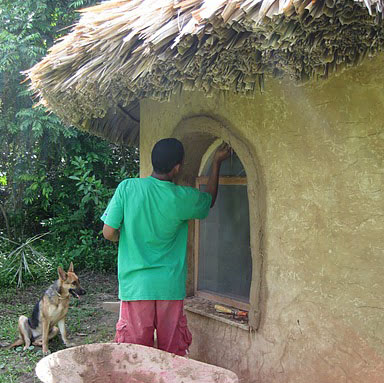
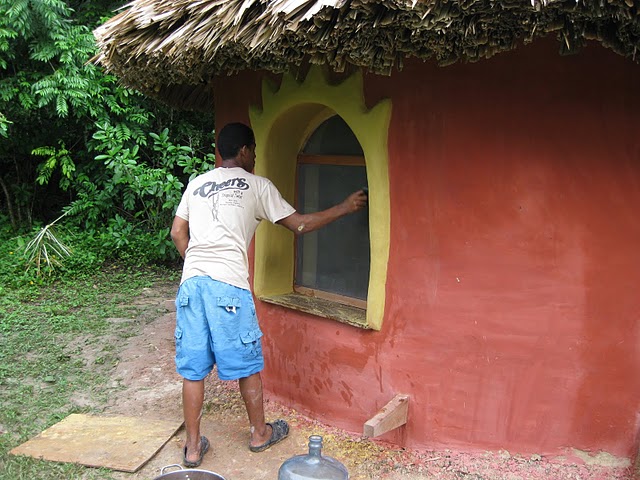 Designer & sculptor of windows.