| Large Arizona Shop Structure by John Annesley |
I have a strong interest in alternative construction techniques that fundamentally make sense even if the ‘how-to’ phase hasn’t been documented for decades and accepted into building codes--because code allows so many people to live in drastically energy inefficient, burnable, rot prone structures that use a lot of materials which are suspect in terms of human health.
Personally, I don’t think living in a timber frame house anywhere on the planet is such a great idea, especially now that most of the plywood sheathing is offgassing formaldehyde into the structure for years, and is ultimately a flammable box that can also be rendered uninhabitable by flooding: take New Orleans as a case-in-point. A wooden framed structure that gets soaked with standing water inside the walls begins to support mold and the whole building generally needs to be torn down. Strawbale is alternative and neat looking and has great R value, but here in the desert its K value (also known as the thermal flywheel effect, a property of thermal mass) that makes structures such as old adobe so much cooler than the surrounding desert without any air conditioning whatsoever except that drawn from the cool of the earth. The only drawbacks of building with adobe bricks or blocks, are that if they’re not reinforced, they can collapse on you during an earthquake. Sand bag walls flex with an earthquake without falling down, and give a lot of thermal mass for storing heat or cool without the need for heating or cooling with machines and fuel or electricity bills- and they don’t cost much. Sand bag wall systems have passed building codes in the California desert, for example. The ideal situation would be thermal mass with insulation on the outside, but not rigid foam as is used throughout the southwest- it creates a vapor barrier which is destructive to earth based structures such as adobe, rammed earth, cobb or earthbags. Its also a bad idea to use with a plywood skinned building for the same reason: a vapor barrier traps moisture by its very design, and trapped moisture behind the foam or tar paper, against the earth based or wooden walls leads ultimately to rot, which can damage the structure (even leading to structural failure), as well as give rise to mold and mildew which can drive people out of their homes. Earth plasters and lime based plasters breathe and allow water vapor to escape, and are more flexible. If they do crack, they tend to be self-healing because the cracks fill with tiny, dissolved particles of earth or lime. Walls that breathe instead of trapping moisture are commonly thought to be more healthful to live in as they don't give rise to mold and mildew problems anywhere near so much as walls with vapor barriers. These softer plasters do require semi regular re-coating, however the benefit is that they do not induce rot in wood or rust in metal or spalling in brickwork, or any other damp related degradation of the base structure. Lime is also a natural fungicide, meaning it inhibits mold growth- many straw bale and wood framed homes have to be torn down due to mold growing inside walls, especially after flooding.
With the earthbag shop structure, I built a test oven out of the paper/adobe/lime material I used as stucco to coat the earthbags, to make sure it didn’t burn. I built a roaring fire inside the oven for an hour-and-a-half and the oven didn’t smolder, crack, or become charred. The lime in it should inhibit any mold or bacteria from forming even if it stays wet for a long time as in the case of flood or unnoticed water damage. Another very cool feature of this stucco, is that it holds screws and nails, and unlike cement or concrete it can take a sledge hammer blow and simply dent instead of shatter.
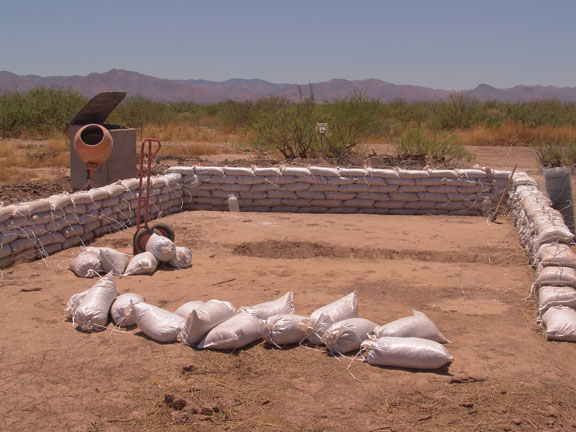
And so it begins--Bags filled with crushed rock and laid into shallow trenches comprise the foundation of this 20 by 50 foot structure. I don't have to worry about frost upheavel because that is largely a symptom of foundations constructed with a lot of portland cement in them. Ordinary portland cement and standard concrete are susceptible to frost and they will crack and upheave in very cold conditions and therefore if used in foundations, need to be in deep trenches that make contact with the warmth of the earth at a depth below the frost line. This is why foundations before 1920 in the U.S. and Europe were built above ground and made from stones and or lime in all but the largest and heaviest structures. Single story residential buildings did not require foundations that extended below the frost line simply because they were not constructed of materials which were structurally damaged by freezing.
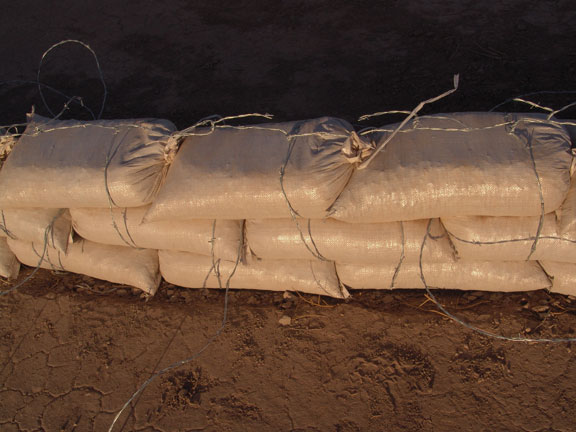
Tamped bags, stacked offset like bricks. The first two feet of the foundation wall is comprised of bags filled with rock to aid in drainage if there is ever flooding at the building site; these rock-filled courses are cinched with barbed wire to the course above and below, the barbed wire acting like velcro to lock the bags in place. The bags will be covered in stucco netting and coated with a paper-adobe and lime render as seen in later images in this series.
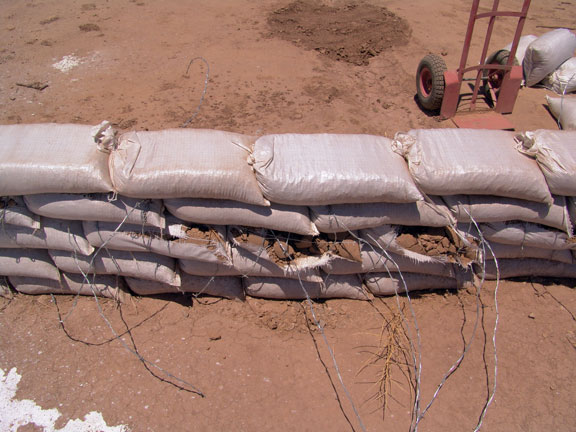
I used two different colors of sand bags with uv coating, green and white. Some of the bags I bought which were supposedly uv coated turned out not to have any such coating and they started dissolving within one week which wasn't a good thing. Above, sand bags in this section of test wall began degrading within a week of sun exposure in Arizona. They appeared fine but after placing more bags atop them and tamping those newly filled bags, the ones that had been exposed to the sun for a week split apart from the tamping action going on above them. If you build using sandbags, make sure to get uv coated ones as they are otherwise designed to degrade quickly.
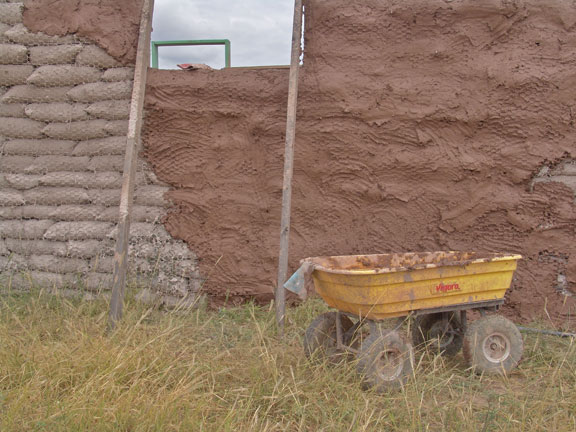
Here parts of the perimeter wall have reached an above-ground height of six bags: about three feet. Earthen structures settle more than most other buildings, and cement based stuccos do not flex and instead crack, often imperceptably but enough to allow water to seep into them and saturate the wall behind the stucco.
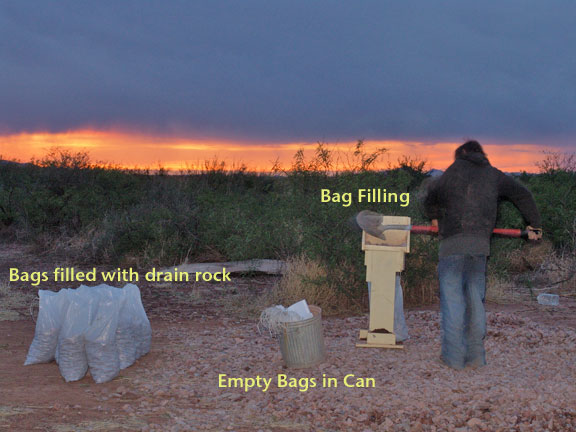
I built a two part bag filling station so that one person could easily fill sand bags. Basically a piece of stove pipe screwed onto the base of wooden box with one side and the top open- the back being a sort of backsplash to contain shovel fulls of dirt. This upper piece sits on and fits into a stand which is tall enough to accomodate a sand bag and is not high enough that the bag slips off the stove pipe when filled. Most folks working with sandbags suggest filling them in place, using a coffee can to carry the earth, which is fine if you have a team of people working or if you're working alone and don't mind taking years to build a modestly sized house.
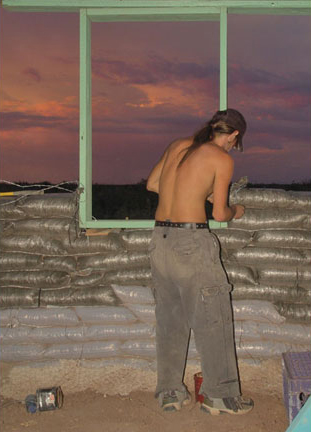
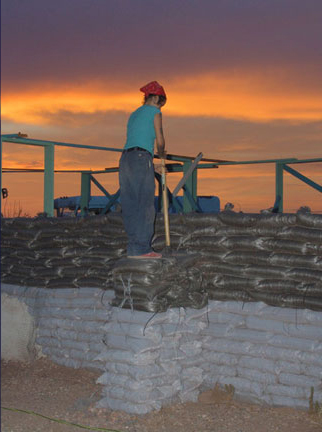
Here, a friend helps stack bags at sunset. A window buck is in place, and this is a shot from inside the structure. The unfinished dirt floor was backfilled using a backhoe mostly, to a height of two feet.
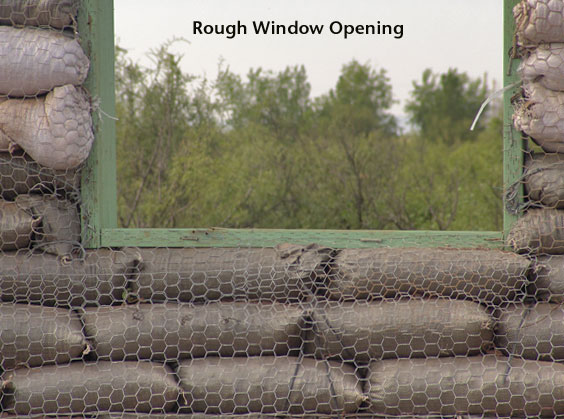
Detail of stucco netting covering the tamped wall of sandbags. Chicken wire could be substituted, though its rated at a lower strength from what I've been told. I've read in earth-bag construction forums that no such netting is required but sooner or later the plastic or burlap bag is going to deteriorate- as I found out it can be a matter of weeks under certain conditions. I've seen old adobe buildings where the stucco netting let loose of the underlying adobe blocks and the whole stucco facing actually sloughed off, I've seen that with straw bale, too. I've also seen straw bale walls with big cracks and sections of stucco sheared off. Stucco netting lends a cohesive web for the stucco/render to grip into, and if that stucco netting is attached through the wall, not just to it--then it can't simply "let go" and separate from the structural wall section beneath it. I attached each face of stucco netting through the earth bag walls using baling wire laid laterally in strands across the center of each bag, so that the netting could be drawn up tight to the faces of the walls- and attached to the other face of stucco netting on the other side of the wall which prevents either face from being able to pull away and fall off.
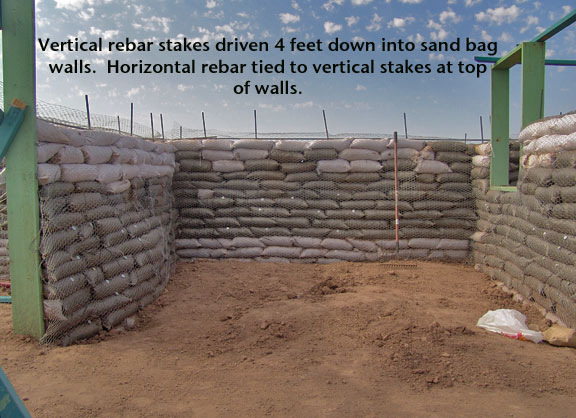
In the photo above, a steel (rebar) bond beam is tied to the vertical rebar stakes in the wall, and these stakes will be welded to vaulted roof truss sections. A second horizontal rebar perimeter will be welded into place at the top of the walls.
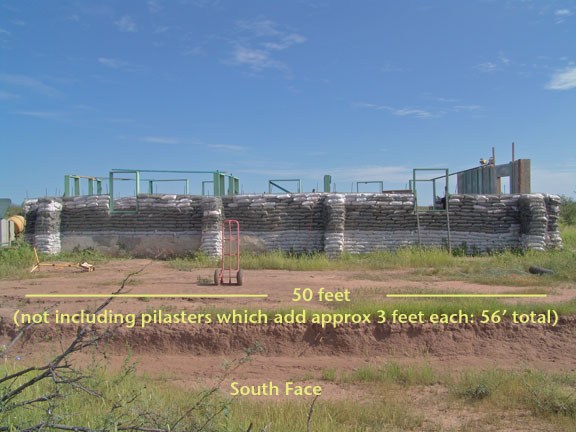
A friend tamping a pilaster, which is a form of minor buttress used to stiffen the walls. Straight sections of sandbag wall seem most stable when such a pilaster is attached at ten foot intervals and at the corners. They're tied into the walls with successive courses of barbed wire interlaced through the wall, as well as having rebar stakes driven through them at angles into the ground and through the walls before they are coated with stucco or render. Note the pilasters at ten foot intervals along the outside wall.
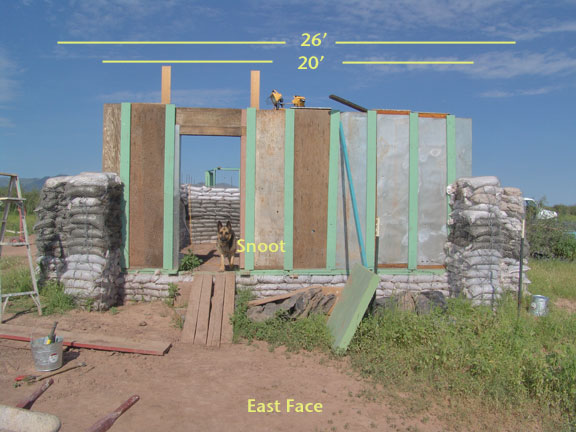
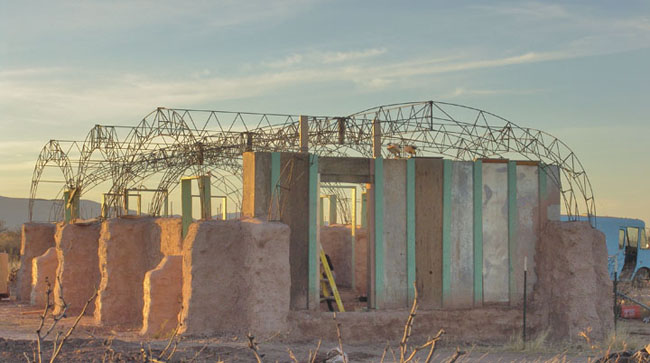
Here you get a glimpse of the east facing wall (far left) and the fact that this building is actually a hybrid structure in terms of wall composition.
The east facing wall is composed of recycled insulated panels from a dismantled walk-in cooler. Several inches of foam sandwiched between two 3/4 inch thick pieces of plywood, skinned (in most cases) with stainless steel. This wall went up in two hours, the others took months of hard labor. It was sobering to note the disparity. Each section was 2 feet wide and 8 feet tall, we nailed on a continuous bottom plate cinched with barbed wire into the lowest rows of rock filled foundation bags, and seamed the vertical elements with painted 2×6, nailed and screwed into the panels. My dog, Snoot, often takes center stage on the job site. Coating Earthbags with Paper-Adobe-Lime stucco
The mix we used was 90 gallons of shredded paper lightly packed into garbage cans, 63 gallons clay-based soil from the site, 12 gallons lime putty made by mixing one 50lb. bag of type S hydrated lime with water and letting stand for at least 48 hours before use, 2 four pound boxes of Twenty Mule Team borax, and enough water to achieve a thick mix appropriate for spraying with the Tirolessa mortar sprayer. So you can see how stiff this mix is, here's the tow mixer with most of the mix still in it, and a 3 gallon pail. At first we were making slurry but because we decided to use a Tirolessa mortar sprayer, we reduced the water content and made a pastey muck instead. The mortar sprayer calls for a mix as thick as toothpaste and worked well eventhough we had to scoop the mud out of the mixer with pails because it was too thick to flow out the 3 inch diameter ABS drain port. The mix was so perfectly pulped that we couldn't see any paper fibers at all.
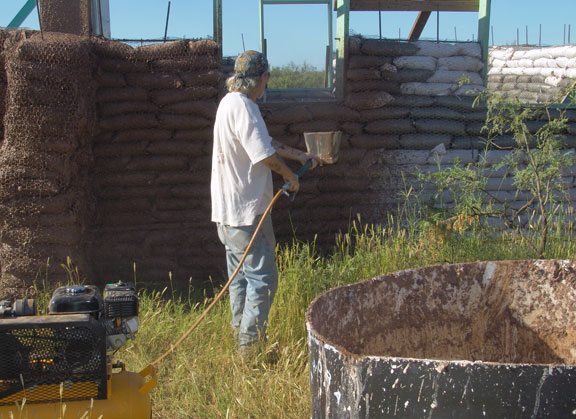
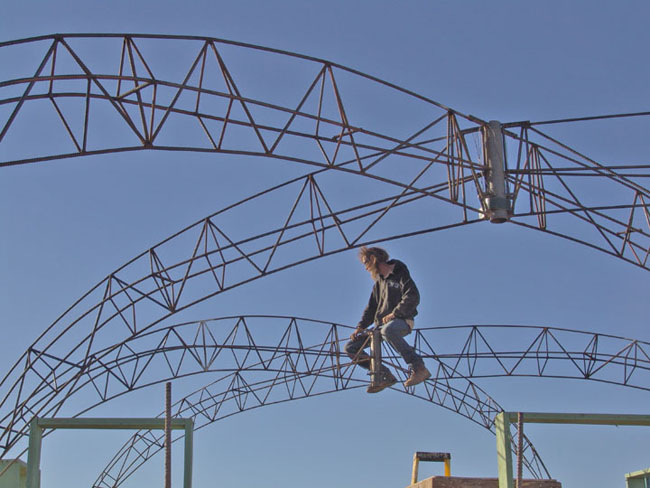
Blowing the paper-adobe-lime-borax mix onto the walls! We're using a Tirolessa mortar sprayer which basically is a stainless steel hopper with four air nozzles at its base to push the mix at high velocity. We're using a 5.5 horsepower gas powered air compressor which I bought two years earlier when I was building a pneumatic-over-hydraulic 20 ton press for making rammed earth block. We tried applying the mix by hand, with rubber gloves and found that whereas the mortar sprayer is fast, it applies only a very thin coat. We would have needed to spray each section of wall about six times to fill the contours of the sandbag walls so we decided to put away the mortar sprayer and get out the rubber gloves. I realize putting mud on this thick will make it more prone to cracking and that it should have gone on in thin coats, but because it does contain lime and adobe soil, any cracks should re-soften when another wet layer is applied, allowing them to flow together and become mended. Traditionally, lime plasters self heal any cracking through a process called autogenous healing, a process common to earth and lime construction. After the earthbag walls were erected and coated with an adobe/paper/lime render, it was time to get underway with the roof. First I made a scale model of the building and the proposed arching trusses which were fabricated from 5/8″ rebar. We used expanded metal lath over stock panels and wired on using safety wire. That was coated with a 1/2″ embedded layer of non-shrink construction grout modified with chopped pva fibers. (pva = poly vinyl acetate).
With zero noted deflection even with this minimal amount of truss work in place, we pressed ahead confident that the engineering was sound.
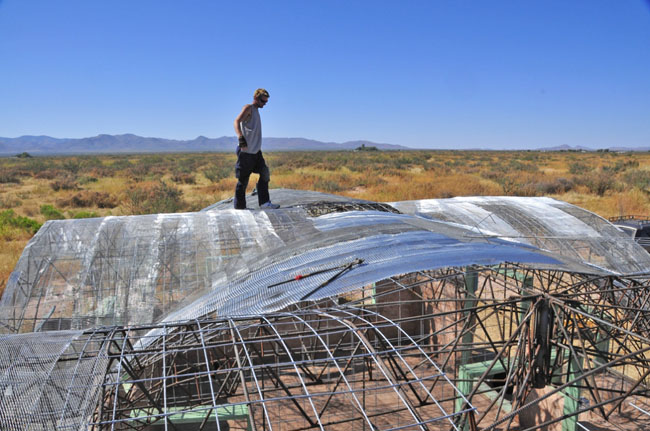
Above: stock panels being attached to rebar purlins and trusses. Expanded metal lath has been attached to entire roof surface. Open square at center is where cuppola will be placed. |
 I moved to rural, southeastern Arizona because the high desert climate agreed with me and there were no building codes here, which allowed me to try a variety of alternative construction projects on my property. My first experience with alternative buildings was via my neighbor out here, who built a strawbale house which burned to the ground inside of half an hour. They had not yet coated the inside of the structure with stucco, and although numerous individuals and websites swear that well compacted straw simply doesn’t burn, my neighbor still lost her home and most every physical object she owned. Other drawbacks so far as I was concerned regarding strawbale are that if they get wet during or after the construction process, they mold and make the structure uninhabitable. If the stucco on the outside cracks and enough moisture builds up inside the wall, it tries to ferment and spontaneous combustion can take place, explosively so--that happened over in California during the winter of 2005 because it was so unusually wet there. Also, rodents love the bales and any little crack or crevice can let them in.